

 Português
Related Posts
[/et_pb_text][/et_pb_column][et_pb_column type=”3_5″ _builder_version=”3.25″ custom_padding=”|||” global_colors_info=”{}” custom_padding__hover=”|||”][et_pb_post_title meta=”off” featured_image=”off” _builder_version=”4.6.0″ title_font=”|700||||on|||” title_font_size=”36px” custom_margin=”4px||4px||true|false” z_index_tablet=”500″ global_colors_info=”{}”][/et_pb_post_title][et_pb_text _builder_version=”4.14.7″ text_font=”||on||||||” text_font_size=”12px” text_letter_spacing=”1px” text_line_height=”1.5em” header_font=”||||||||” custom_margin=”0px|25px||” custom_margin_tablet=”0px|||” custom_margin_phone=”” custom_margin_last_edited=”on|desktop” custom_padding=”0px|0px||||” locked=”off” global_colors_info=”{}” custom_margin__hover_enabled=”on” custom_margin__hover=”0px|25px||”]
In this article we will see how to use the KPI registration function, adding information such as name, description, goal, and the entries of your metrics in a simple and fast way.
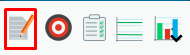
[/et_pb_text][et_pb_text _builder_version=”4.14.8″ custom_margin=”-45px||0px” custom_padding=”20px|15px|20px|15px|true|true” hover_enabled=”0″ border_width_top=”5px” border_color_top=”#0c71c3″ border_width_right=”1px” border_color_right=”#d6d6d6″ border_width_bottom=”1px” border_color_bottom=”#d6d6d6″ border_width_left=”1px” border_color_left=”#d6d6d6″ box_shadow_style=”preset3″ global_colors_info=”{}” sticky_enabled=”0″]To use quick registration and create a new KPI it is very simple, just click on the first icon in the menu and the window for creating the new KPI will appear.
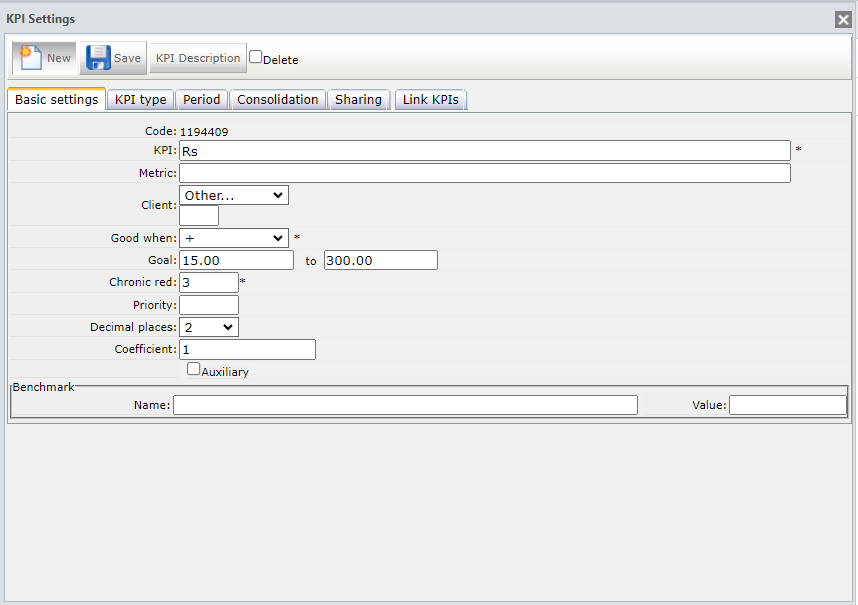
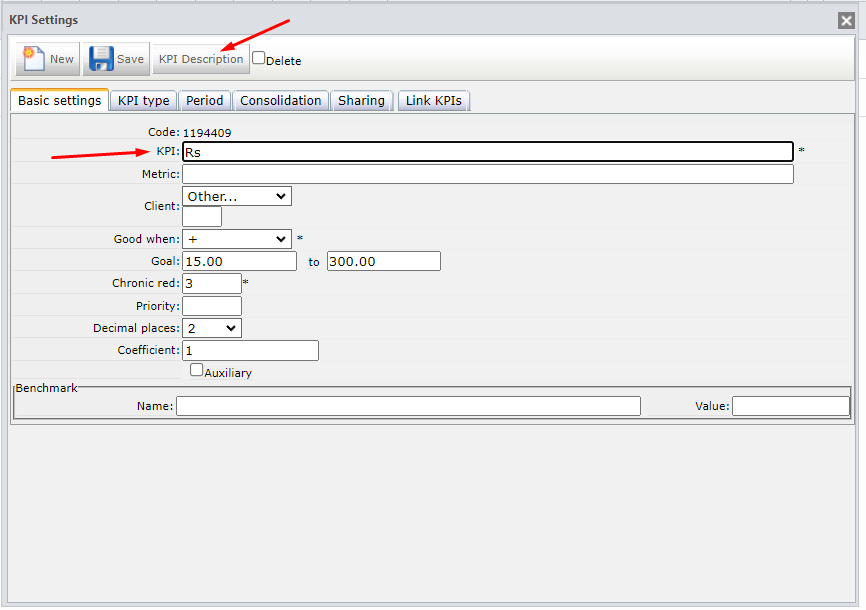
After clicking on the icon, the registration screen will appear.
If you are unsure how to define your KPIs, you can access our knowledge base
After picking a result to manage, you must register the name of your KPI.
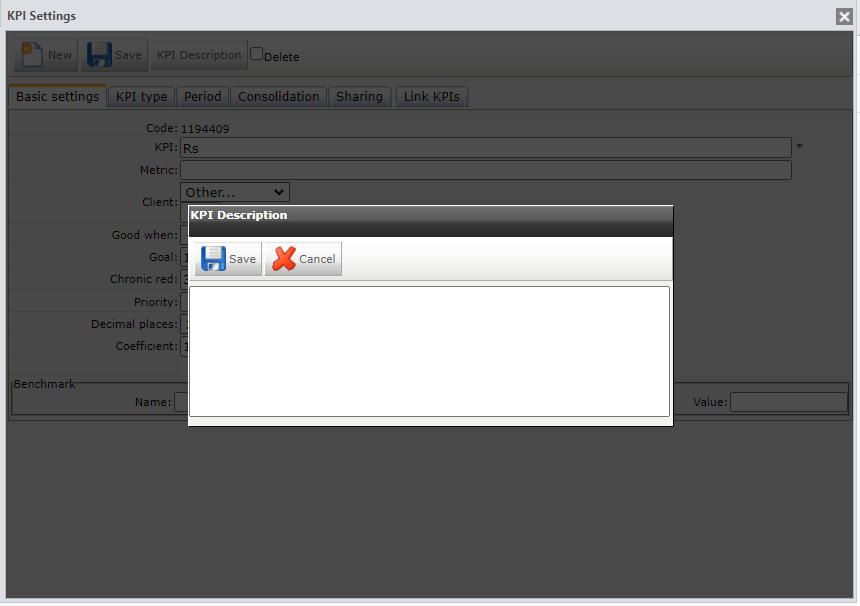
The description of the KPI is optional. You should describe important information that will assist you in tracking your KPI, for example: calculation formula, data origin, metric parameters, etc.
Next, you must select if the result is GOOD WHEN:
- More +
- Equal/Same =
- Less –
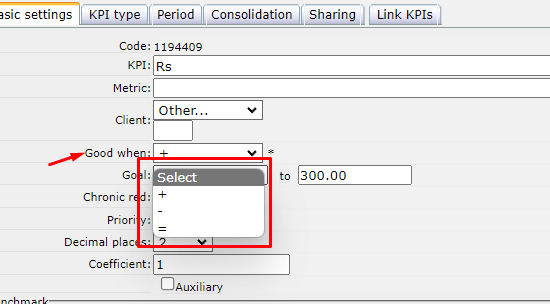
In the next step, you must enter the Monthly Goal value after entering the measurement unit of your KPI, such as:
- $
- Unit
- Quantity
- Others

After defining the unit of measurement, select how the goal should be calculated. To do this, choose from the options:
- Sum of Period – calculates the sum of the goals from January to December.
- Average of period – calculates the average of the goals from January to December.
- Monthly comparison of process range againt client range – shows the goal value month by month.

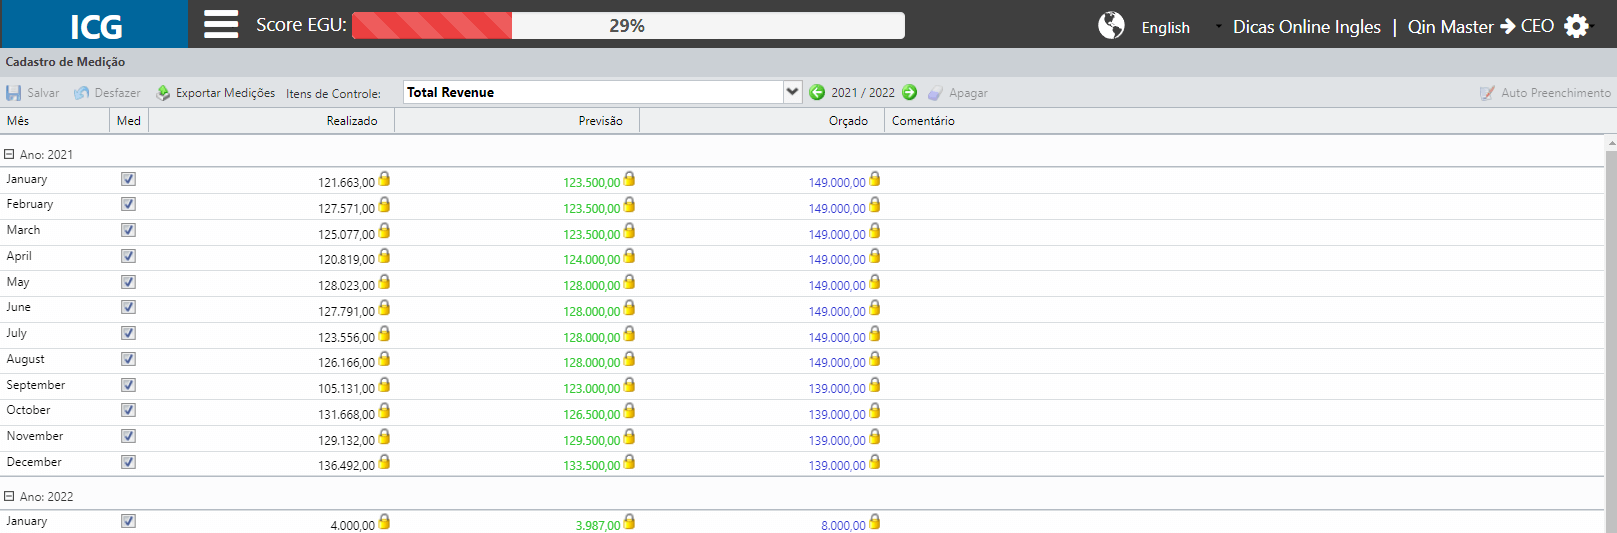
The last step is to add the history values of your result. To do this, simply click in the Accomplished boxes and type in the information.
Note: The green range will be set automatically by the system based on your Metrics history.
After filling in, simply click the “Done” button. The system will apply an update to the screen and your item will be listed at the beginning of your dashboard.
After being created, your KPI will be displayed with the data you added. If you want to change any information, click on the registration button again, or click on the KPI Settings button.
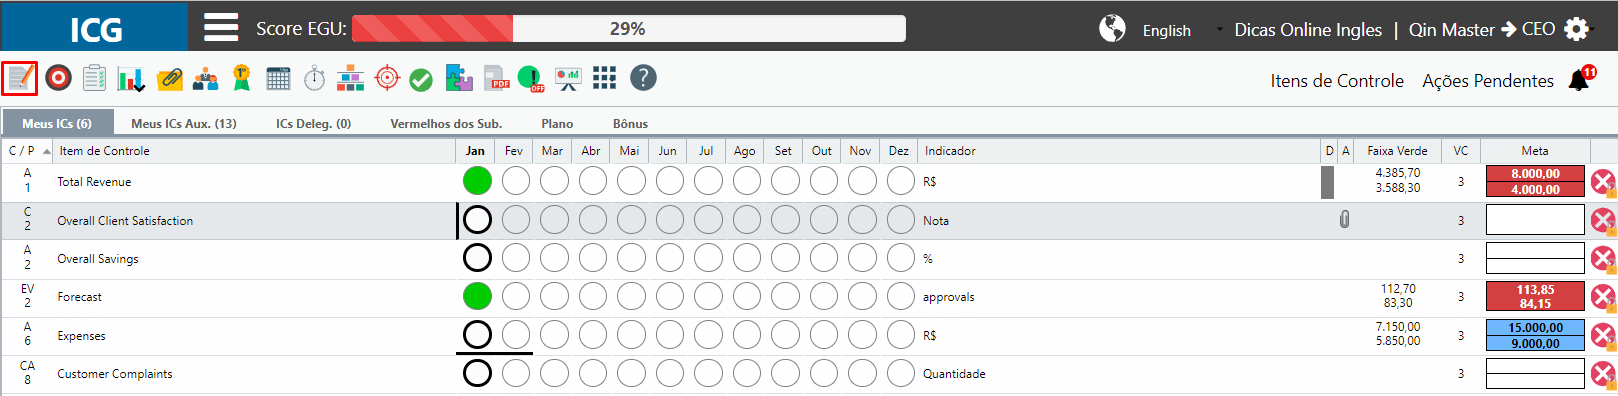
Or, if you prefer, you can also access the metrics icon and edit the accomplished, forecast, or goal values directly on this screen.

Para mais informações sobre o Cadastro de Item de Controle, selecione a aba desejada:
[/et_pb_text][et_pb_button button_text=”Dados Básicos” button_alignment=”center” _builder_version=”3.21.1″ custom_button=”on” button_text_size=”14px” button_text_color=”#ffffff” button_bg_color=”#4378ad” button_border_width=”1px” button_border_color=”#d6d6d6″ button_border_radius=”0px” button_letter_spacing=”1px” button_font=”|||on|||||” button_use_icon=”off” custom_margin=”4px||21px|0px” custom_padding=”|250px||250px||true” global_colors_info=”{}”][/et_pb_button][et_pb_button button_url=”https://suporte.quattrus.com/cadastro-item-tipos-de-item/” url_new_window=”on” button_text=”Tipos de Item” button_alignment=”center” _builder_version=”3.19.3″ custom_button=”on” button_text_size=”14px” button_text_color=”#424242″ button_border_width=”1px” button_border_color=”#d6d6d6″ button_border_radius=”0px” button_letter_spacing=”1px” button_font=”|||on|||||” button_use_icon=”off” custom_margin=”-22px|||0px” custom_padding=”|255px||255px||true” global_colors_info=”{}”][/et_pb_button][et_pb_button button_url=”https://suporte.quattrus.com/cadastro-item-periodo-do-item/” url_new_window=”on” button_text=”Período do Item” button_alignment=”center” _builder_version=”3.21.1″ custom_button=”on” button_text_size=”14px” button_text_color=”#424242″ button_border_width=”1px” button_border_color=”#d6d6d6″ button_border_radius=”0px” button_letter_spacing=”1px” button_font=”|||on|||||” button_use_icon=”off” custom_margin=”-31px||23px|0px” custom_padding=”|241px||241px||true” global_colors_info=”{}”][/et_pb_button][et_pb_button button_url=”https://suporte.quattrus.com/cadastro-item-totalizacao-de-item/” url_new_window=”on” button_text=”Totalização de Item” button_alignment=”center” _builder_version=”3.21.1″ custom_button=”on” button_text_size=”14px” button_text_color=”#424242″ button_border_width=”1px” button_border_color=”#d6d6d6″ button_border_radius=”0px” button_letter_spacing=”1px” button_font=”|||on|||||” button_use_icon=”off” custom_margin=”-24px|||0px” custom_padding=”|225px||225px||true” global_colors_info=”{}”][/et_pb_button][et_pb_button button_url=”https://suporte.quattrus.com/cadastro-item-compartilhamento-de-item/” url_new_window=”on” button_text=”Compartilhamento de Item” button_alignment=”center” _builder_version=”3.21.1″ custom_button=”on” button_text_size=”14px” button_text_color=”#424242″ button_border_width=”1px” button_border_color=”#d6d6d6″ button_border_radius=”0px” button_letter_spacing=”1px” button_font=”|||on|||||” button_use_icon=”off” custom_margin=”-31px|||0px” custom_padding=”|196px||196px||true” global_colors_info=”{}”][/et_pb_button][et_pb_button button_url=”https://suporte.quattrus.com/cadastro-item-vinculacao-de-item/” url_new_window=”on” button_text=”Vinculação de Item” button_alignment=”center” _builder_version=”3.21.1″ custom_button=”on” button_text_size=”14px” button_text_color=”#424242″ button_border_width=”1px” button_border_color=”#d6d6d6″ button_border_radius=”0px” button_letter_spacing=”1px” button_font=”|||on|||||” button_use_icon=”off” custom_margin=”-31px|||0px” custom_padding=”|229px||229px||true” global_colors_info=”{}”][/et_pb_button][/et_pb_column][/et_pb_row][/et_pb_section]