[et_pb_section fb_built=”1″ _builder_version=”4.4.8″][et_pb_row column_structure=”1_5,3_5,1_5″ module_class=” et_pb_row_fullwidth” _builder_version=”3.25″ width=”89%” width_tablet=”80%” width_phone=”” width_last_edited=”on|desktop” max_width=”89%” max_width_tablet=”80%” max_width_phone=”” max_width_last_edited=”on|desktop” make_fullwidth=”on”][et_pb_column type=”1_5″ _builder_version=”3.25″ custom_padding=”|||” custom_padding__hover=”|||”][et_pb_text disabled_on=”on|on|” admin_label=”Itens Usuário – Navegação vertical” _builder_version=”4.9.2″ max_width=”100%” z_index_tablet=”500″ saved_tabs=”all”]
[/et_pb_text][et_pb_text disabled_on=”on|on|” admin_label=”Artigos Relacionados” _builder_version=”4.9.2″ text_font=”|600|||||||” text_text_color=”#727272″ header_line_height=”1.1em” header_2_font=”|800||||on|||” header_2_text_align=”left” header_2_text_color=”#494949″ header_3_font=”|600|||||||” header_3_text_color=”#494949″ header_3_font_size=”14px” header_3_line_height=”1.2em” module_alignment=”left” hover_enabled=”0″ z_index_tablet=”500″ text_text_shadow_horizontal_length_tablet=”0px” text_text_shadow_vertical_length_tablet=”0px” text_text_shadow_blur_strength_tablet=”1px” link_text_shadow_horizontal_length_tablet=”0px” link_text_shadow_vertical_length_tablet=”0px” link_text_shadow_blur_strength_tablet=”1px” ul_text_shadow_horizontal_length_tablet=”0px” ul_text_shadow_vertical_length_tablet=”0px” ul_text_shadow_blur_strength_tablet=”1px” ol_text_shadow_horizontal_length_tablet=”0px” ol_text_shadow_vertical_length_tablet=”0px” ol_text_shadow_blur_strength_tablet=”1px” quote_text_shadow_horizontal_length_tablet=”0px” quote_text_shadow_vertical_length_tablet=”0px” quote_text_shadow_blur_strength_tablet=”1px” header_text_shadow_horizontal_length_tablet=”0px” header_text_shadow_vertical_length_tablet=”0px” header_text_shadow_blur_strength_tablet=”1px” header_2_text_shadow_horizontal_length_tablet=”0px” header_2_text_shadow_vertical_length_tablet=”0px” header_2_text_shadow_blur_strength_tablet=”1px” header_3_text_shadow_horizontal_length_tablet=”0px” header_3_text_shadow_vertical_length_tablet=”0px” header_3_text_shadow_blur_strength_tablet=”1px” header_4_text_shadow_horizontal_length_tablet=”0px” header_4_text_shadow_vertical_length_tablet=”0px” header_4_text_shadow_blur_strength_tablet=”1px” header_5_text_shadow_horizontal_length_tablet=”0px” header_5_text_shadow_vertical_length_tablet=”0px” header_5_text_shadow_blur_strength_tablet=”1px” header_6_text_shadow_horizontal_length_tablet=”0px” header_6_text_shadow_vertical_length_tablet=”0px” header_6_text_shadow_blur_strength_tablet=”1px” box_shadow_horizontal_tablet=”0px” box_shadow_vertical_tablet=”0px” box_shadow_blur_tablet=”40px” box_shadow_spread_tablet=”0px” saved_tabs=”all” sticky_enabled=”0″]
Related Posts
[/et_pb_text][/et_pb_column][et_pb_column type=”3_5″ _builder_version=”3.25″ custom_padding=”|||” custom_padding__hover=”|||”][et_pb_post_title meta=”off” featured_image=”off” _builder_version=”3.19.17″ title_font=”|700||||on|||” title_font_size=”36px” border_width_bottom=”5px” border_color_bottom=”#0c71c3″][/et_pb_post_title][et_pb_text _builder_version=”4.9.2″ custom_margin=”-50px|||||false” custom_padding=”20px|25px||25px||true” hover_enabled=”0″ border_color_top=”#0c71c3″ sticky_enabled=”0″]
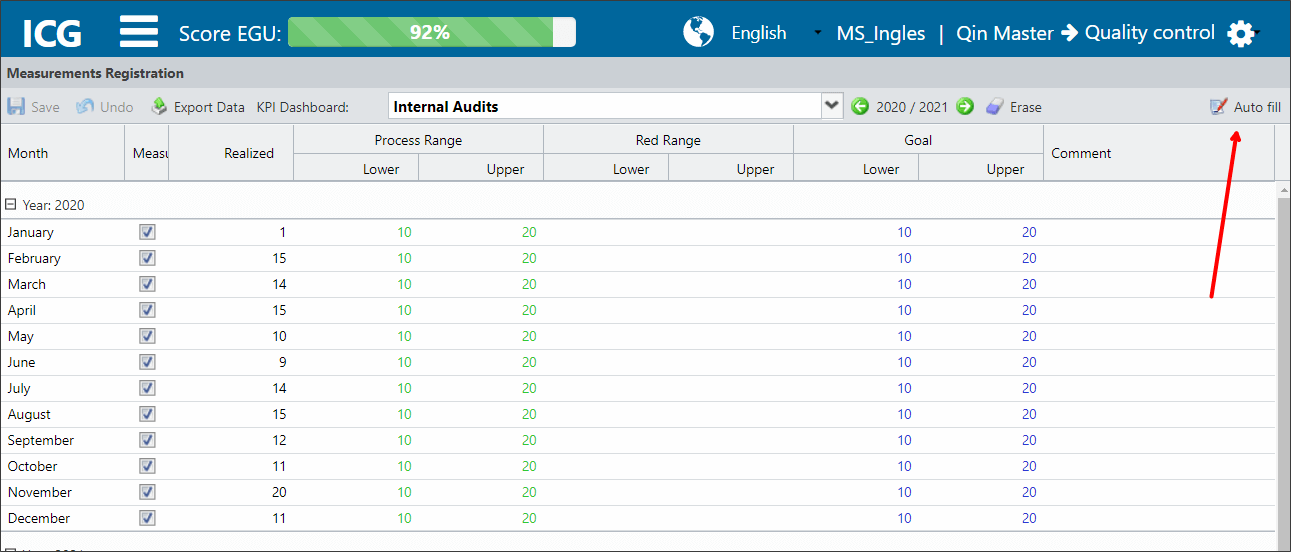
In the measurement screen of the ICG, it is possible to enter the values manually, entering each field information by field or using the “Autofill” tool, located in the upper right corner.
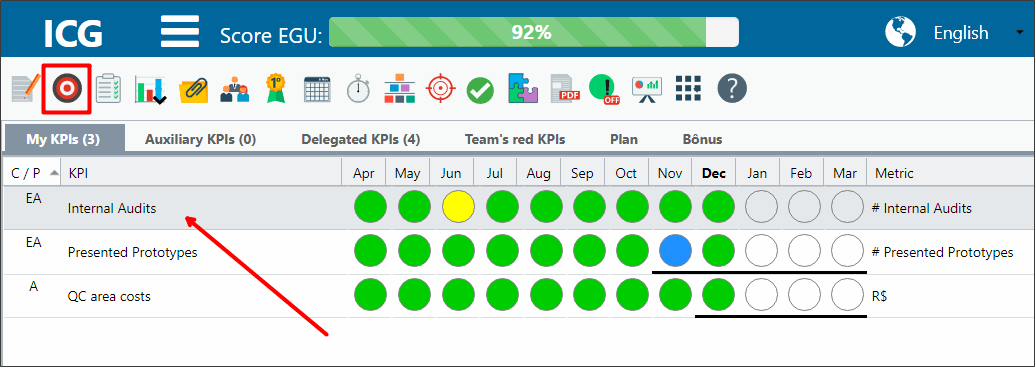
To do this, select the desired KPI and click on the measurement icon.
Click the Autofill button.
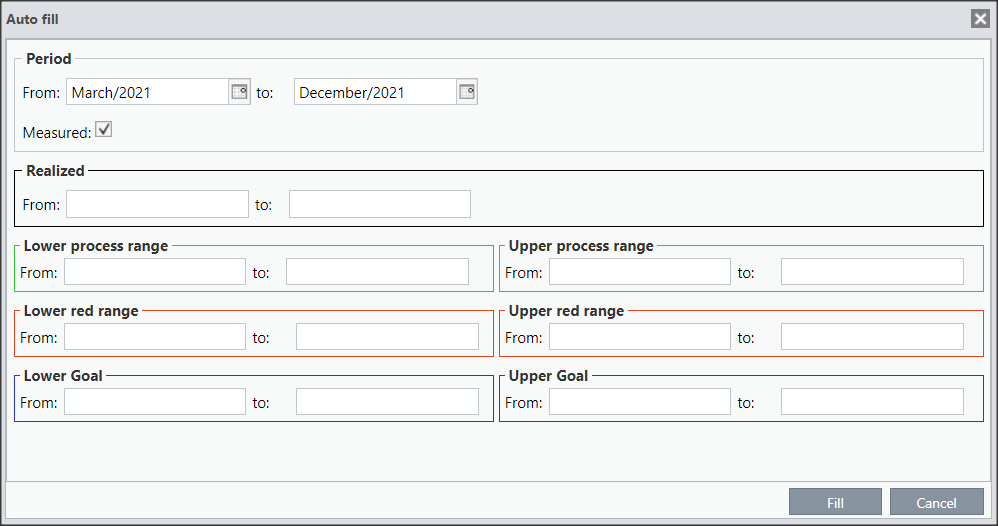
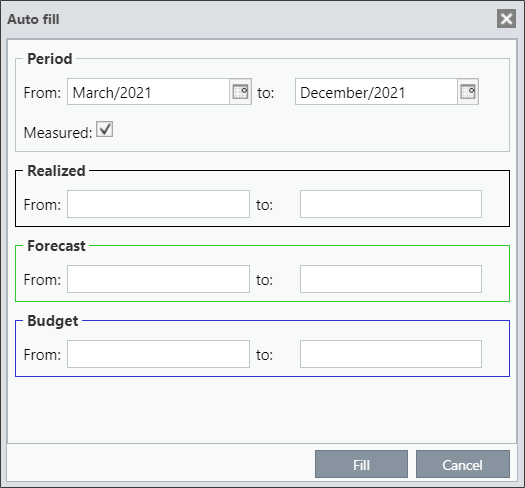
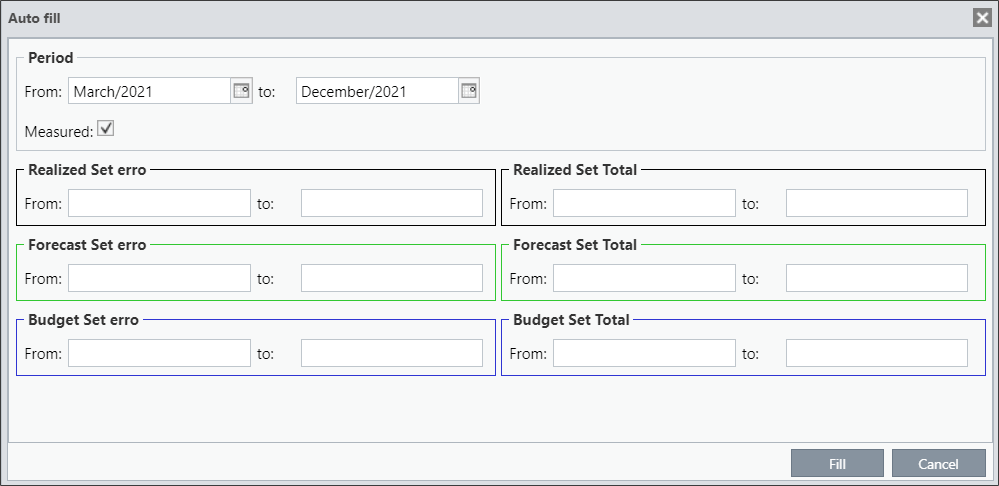
For each type of KPI there will be fields referring to Accomplished, Green Band (Expected) and Customer Band (Budgeted). See the Autofill field below for each type of KPI:
[/et_pb_text][et_pb_toggle title=”1C” _builder_version=”4.9.2″ custom_margin=”-30px|25px||25px||true” custom_margin_tablet=”-20px||” custom_margin_phone=”” custom_margin_last_edited=”on|tablet” custom_padding=”||||true” hover_enabled=”0″ sticky_enabled=”0″]
[/et_pb_toggle][et_pb_toggle title=”2A and 2C” _builder_version=”4.9.2″ custom_margin=”-44px|25px||25px||true” custom_margin_tablet=”-28px|||” custom_margin_phone=”” custom_margin_last_edited=”on|tablet” custom_padding=”||||true” hover_enabled=”0″ sticky_enabled=”0″]
[/et_pb_toggle][et_pb_toggle title=”2B” _builder_version=”4.9.2″ custom_margin=”-44px|25px||25px||true” custom_margin_tablet=”-28px|||” custom_margin_phone=”” custom_margin_last_edited=”on|tablet” custom_padding=”||||true” hover_enabled=”0″ sticky_enabled=”0″]
[/et_pb_toggle][et_pb_text admin_label=”Importante” _builder_version=”4.9.2″ background_color=”rgba(70,168,201,0.34)” custom_margin=”-30px|70px|30px|70px||true” custom_margin_tablet=”-10px||20px” custom_margin_phone=”|25px||50px” custom_margin_last_edited=”on|phone” custom_padding=”10px|15px|10px|20px|true” hover_enabled=”0″ border_width_left=”5px” border_color_left=”rgba(32,159,201,0.59)” box_shadow_style=”preset3″ saved_tabs=”all” sticky_enabled=”0″]
IMPORTANT:
In this example, we are using a type 2A KPI, but all KPIs follow the same pattern, what will differentiate are the names of the fields to be filled out.
[/et_pb_text][et_pb_text _builder_version=”4.9.2″ custom_margin=”|25px||25px||true” hover_enabled=”0″ sticky_enabled=”0″]
You must first select the period you want to fill, fill in the desired values and click on “Fill”.
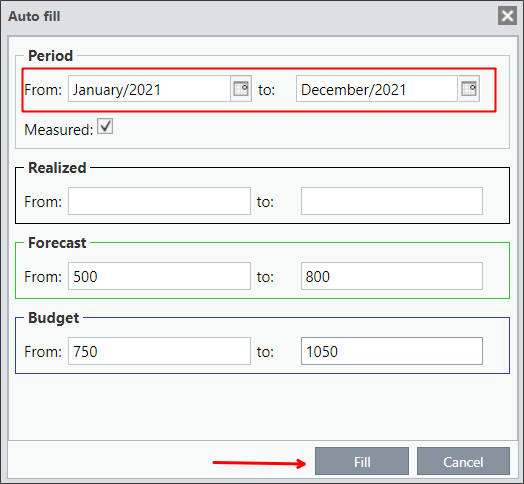
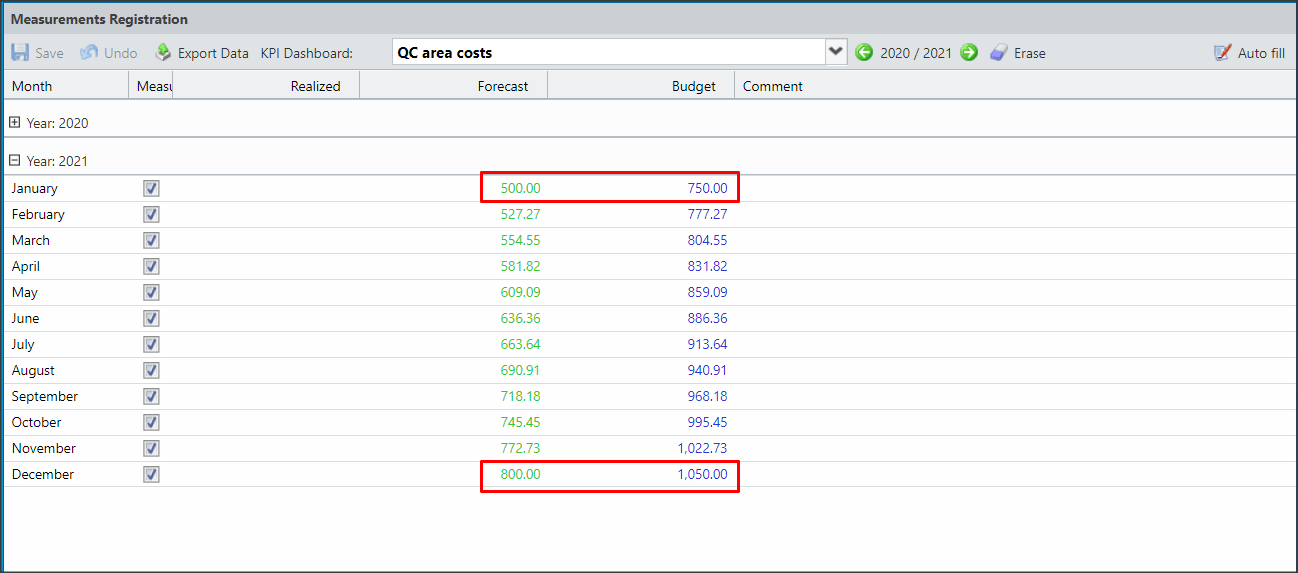
Note above that the values for “FROM” and “UNTIL” of the Forecast and Budget fields are different. This means that the initial month of the period will have the value of the “FROM” field and the final month of the period will have the value of the “UNTIL” field. The months between January and December, in this case, will have a gradual increase from 500 to 800. See below:
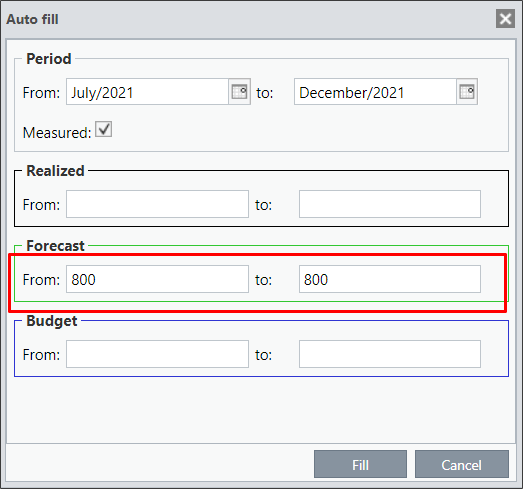
Now we are going to put the same value for the “FROM” field and for the “UNTIL” field. In this case, the period will be from July until December.
All measurements will be the same from July to December:
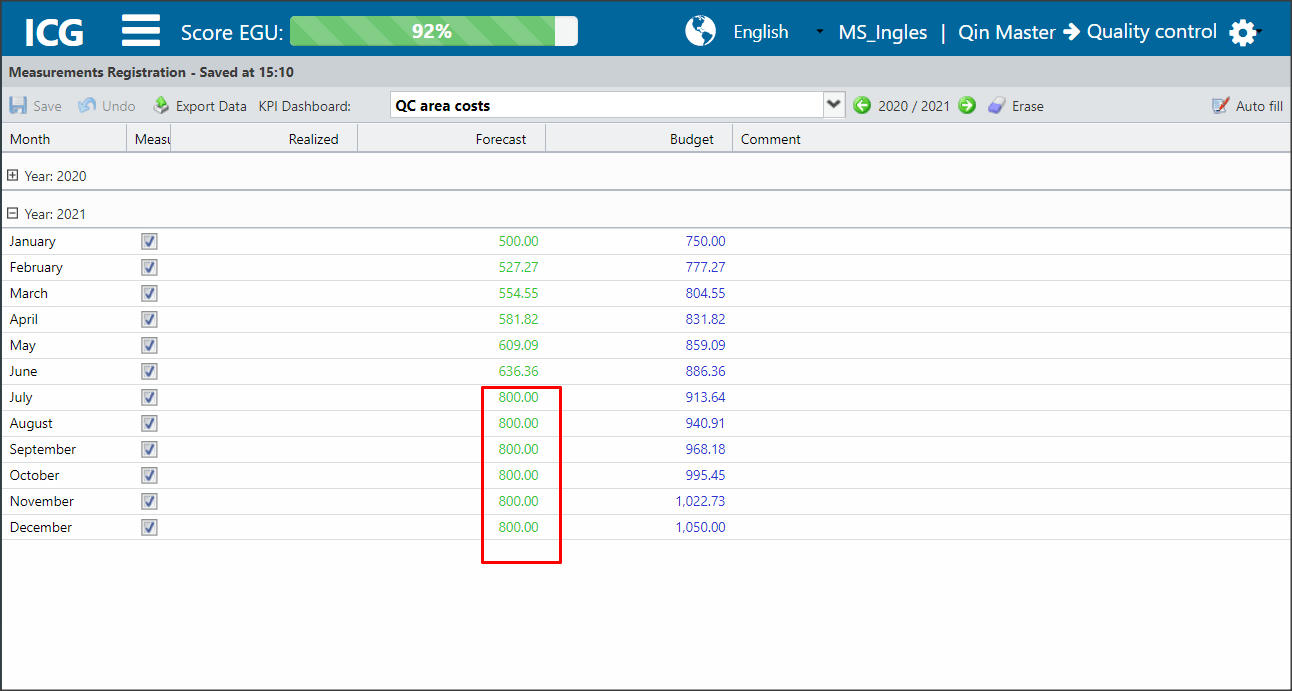
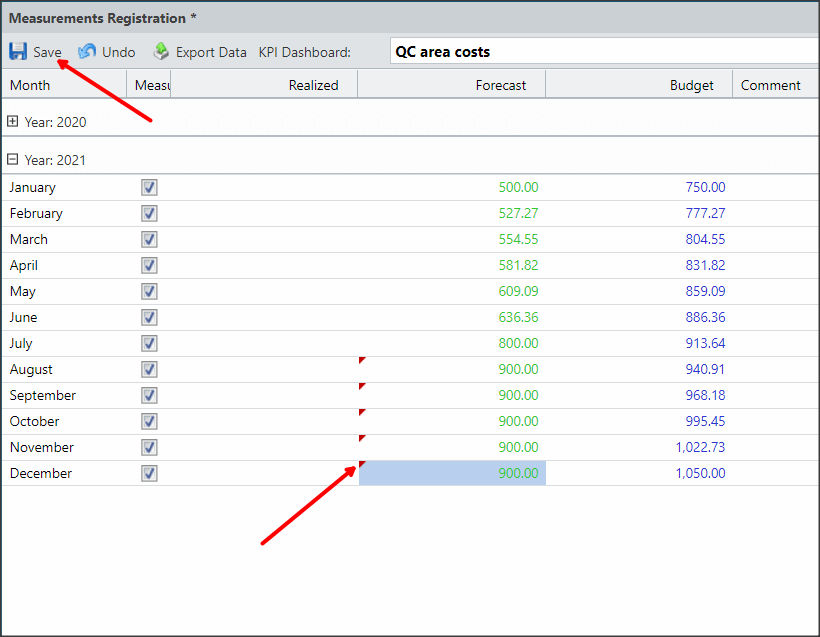
If your measurements are indicated by a red arrow, it means that there is a need to save the changes.
[/et_pb_text][et_pb_text admin_label=”Borda Inferior” _builder_version=”3.27.4″ custom_margin=”-40px|||||false” custom_padding=”|25px||25px||true” box_shadow_style=”preset3″]
TESTE
[/et_pb_text][/et_pb_column][et_pb_column type=”1_5″ _builder_version=”3.25″ custom_padding=”|||” custom_padding__hover=”|||”][et_pb_image src=”https://suporte.quattrus.com/wp-content/uploads/2021/03/Artboard-2-copy-5.jpg” align_tablet=”center” align_phone=”” align_last_edited=”on|desktop” disabled_on=”on|on|” admin_label=”ESP – Banner – Contato Suporte” _builder_version=”4.9.2″ z_index=”0″ hover_enabled=”0″ always_center_on_mobile=”on” saved_tabs=”all” locked=”off” title_text=”Artboard 2 copy 5″ sticky_enabled=”0″][/et_pb_image][et_pb_image src=”https://suporte.quattrus.com/wp-content/uploads/2021/03/Prancheta-1.jpg” url=”https://www.qualitin.com.br/consultoria/” url_new_window=”on” align_tablet=”center” align_phone=”” align_last_edited=”on|desktop” disabled_on=”on|on|” admin_label=”Banner – Consultoria” _builder_version=”4.9.2″ max_width=”100%” hover_enabled=”0″ saved_tabs=”all” title_text=”Prancheta 1″ sticky_enabled=”0″][/et_pb_image][/et_pb_column][/et_pb_row][/et_pb_section]


 Português