Related Posts
[/et_pb_text][/et_pb_column][et_pb_column type=”3_5″ _builder_version=”3.25″ custom_padding=”|||” global_colors_info=”{}” custom_padding__hover=”|||”][et_pb_post_title meta=”off” featured_image=”off” _builder_version=”3.19.18″ title_font=”|700||||on|||” title_font_size=”36px” border_width_bottom=”5″ border_color_bottom=”#0c71c3″ global_colors_info=”{}”][/et_pb_post_title][et_pb_text admin_label=”Info” _builder_version=”4.10.4″ text_font=”||on||||||” text_font_size=”12px” text_letter_spacing=”1px” text_line_height=”1.5em” custom_margin=”-40px|0px||” custom_margin_tablet=”-20px|||” custom_margin_phone=”” custom_margin_last_edited=”on|phone” custom_padding=”0px|0px||” z_index_tablet=”500″ global_colors_info=”{}” custom_margin__hover_enabled=”on” custom_margin__hover=”-40px|0px||”]
You will be able to enter new users, edit existing user information, inactivate or delete a user who is no longer in the company. Don’t forget that, even though you have the Administrator profile, it is possible that do not have permissions to enter or change a user.
[/et_pb_text][et_pb_text admin_label=”Lista de tópicos” _builder_version=”4.10.4″ max_width=”80%” module_alignment=”center” custom_margin=”-20px||0px|” custom_margin_tablet=”0px||” custom_margin_phone=”” custom_margin_last_edited=”on|phone” custom_padding=”20px||0px|25px” border_radii=”on|15px|15px|15px|15px” border_width_all=”1px” border_color_all=”#d6d6d6″ box_shadow_style=”preset1″ global_colors_info=”{}”]In this article we will see:
- How to Register Users
- How to Serach for Users
- How to Inactivate or Delete Users
- How to Export a List of Users
How to Register Users
[/et_pb_text][et_pb_text ul_item_indent=”30px” _builder_version=”4.10.4″ custom_margin=”|25px|0px|25px||true” custom_padding=”||0px” global_colors_info=”{}”]Click on one of the icons shown below:
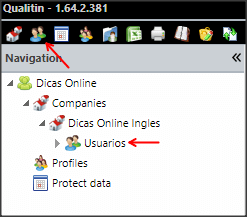
When the User Search screen opens, click New.

Fill in the information for the new user on the General Registration tab.
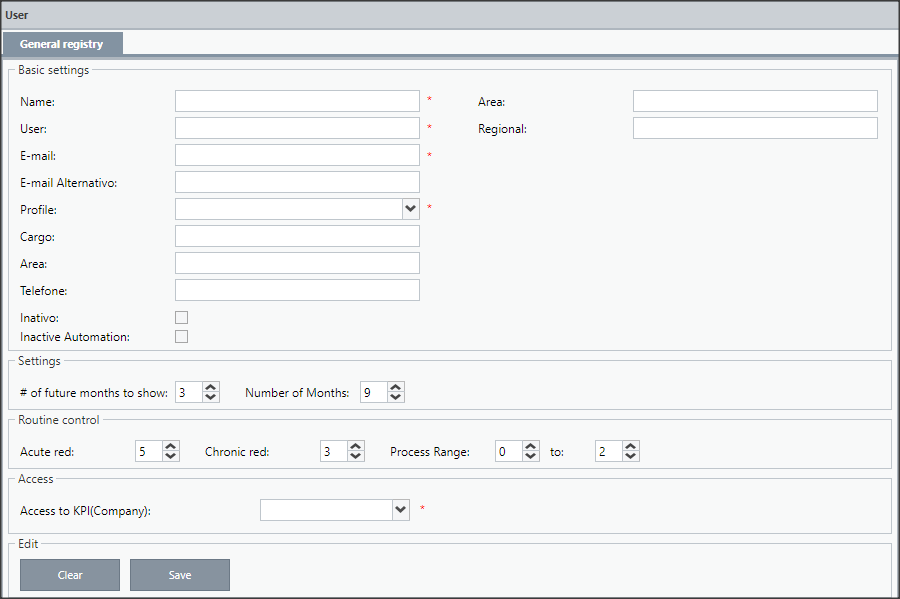
On the General Registration tab fill in the fields
- Name: Full name of user
- User: Name used to log in to the ICG
- E-mail: User’s e-mail
Obs: it will be through this email that the user will receive all the information regarding the ICG - Profile: Select a profile already registered
- Sector: If the company is fragmented by sectors, it can inform the user’s sector
- Settings: By default the settings will come according to the Client, but can be changed for each user
- Routine Control: The control of the routine will come according to the Customer, but it can be configured for each user
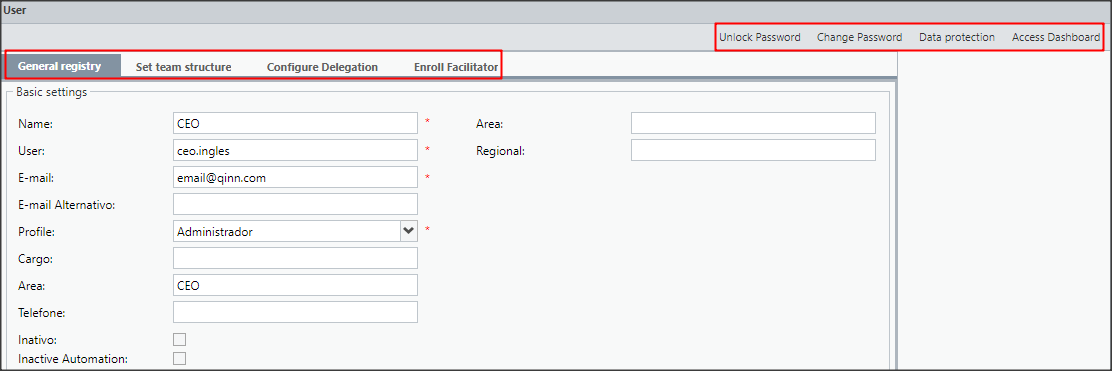
Clicking on Save will enable the other tabs Configure Subordination, Configure Delegation, Register Facilitator and also the buttons Unlock Password, Change Password, Data Protection and Access Dashboard.
Administrative Access
If the user is configured with a profile that gives access to the Admin Panel, you must define which companies the user will have access to.
To do this, just click ![]() on the Administrative Access’ field to activate access to the companies.
on the Administrative Access’ field to activate access to the companies.

[/et_pb_text][et_pb_text _builder_version=”4.10.4″ _module_preset=”default” global_colors_info=”{}”]
User Registration Tabs
[/et_pb_text][et_pb_tabs _builder_version=”4.10.4″ body_font=”||||||||” custom_margin=”|25px||25px” custom_padding=”||15px” global_colors_info=”{}”][et_pb_tab title=”Configure Subordination” _builder_version=”4.10.4″ global_colors_info=”{}”]In this tab you can define the leader of this user.
To do this, simply type the name or select it from the list and then click Create Subordination.
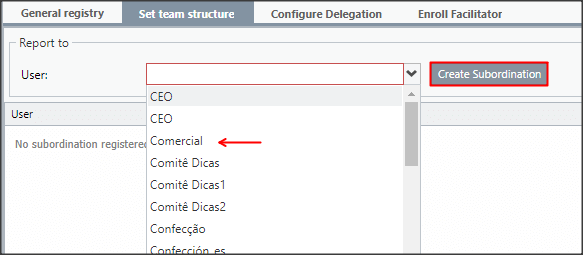
The user will be displayed below. To undo the subordination, select ![]() in the respective record.
in the respective record.

To delegate a KPI to another user, you can either search by the name of the KPI or select it from the list.
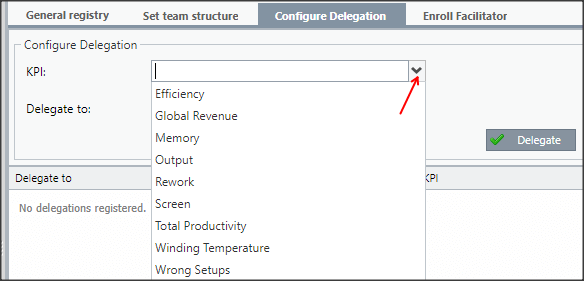
Then select the user to whom you want to delegate the KPI.
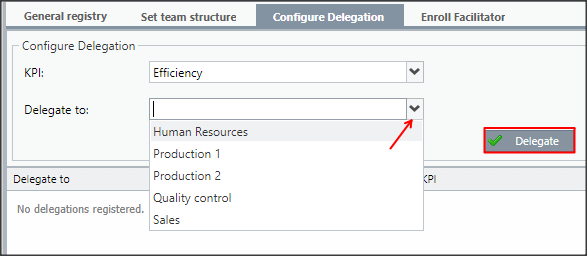
You can use the filter to help with selection:
- Direct: only subordinates of the user
- My Peers: users reporting to the same leader as yours
- All: All company users
Made the selection, just click onDelegate.
IMPORTANT:
It is possible to delegate a cKPI to two or more users, however, only here via the Admin Panel
To remove a delegation, just click ![]() on the respective record.
on the respective record.

[/et_pb_tab][et_pb_tab title=”Register Facilitator” _builder_version=”4.10.4″ body_font=”||||||||” global_colors_info=”{}”]
In this tab you can configure the Facilitator configuration of this user or of its Facilitators, if you have the ICG Facilitator permission.

For full details of this feature, go to the Configure Facilitator article.
[/et_pb_tab][/et_pb_tabs][et_pb_text _builder_version=”4.10.4″ _module_preset=”default” global_colors_info=”{}”]User Registration Buttons
[/et_pb_text][et_pb_tabs _builder_version=”4.10.4″ body_font=”||||||||” custom_margin=”|25px||25px” custom_padding=”||0px” global_colors_info=”{}”][et_pb_tab title=”Unlock Password” _builder_version=”4.10.4″ body_font=”||||||||” global_colors_info=”{}”]This feature can be used when the user is blocked due to excessive attempts to access the ICG.
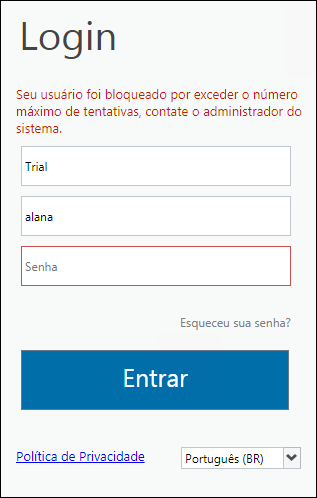
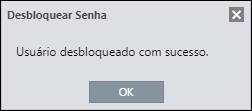
To unlock it, just click on the Unlock Password button. This way, the ICG will free the user to try again.
On this screen you can change a user’s password.
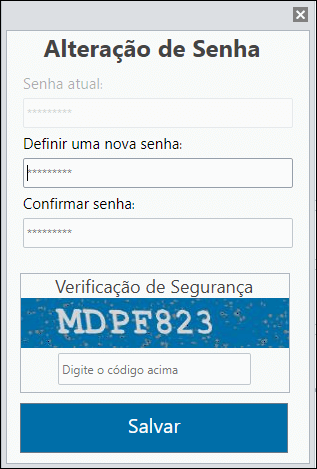
Just fill in the fields Set a New Password and Confirm Password and then fill in the Security Verification and Save field.
[/et_pb_tab][et_pb_tab title=”Data Protection” _builder_version=”4.10.4″ custom_padding=”||15px” global_colors_info=”{}”]IMPORTANT:
For security reasons, the password on this screen is a temporary password. As soon as the user logs in with this password, the system will request the registration of a new password.
By clicking on this button, you will be able to view the data protection that this user’s KPIs are part of, change them and also configure Exceptions by period
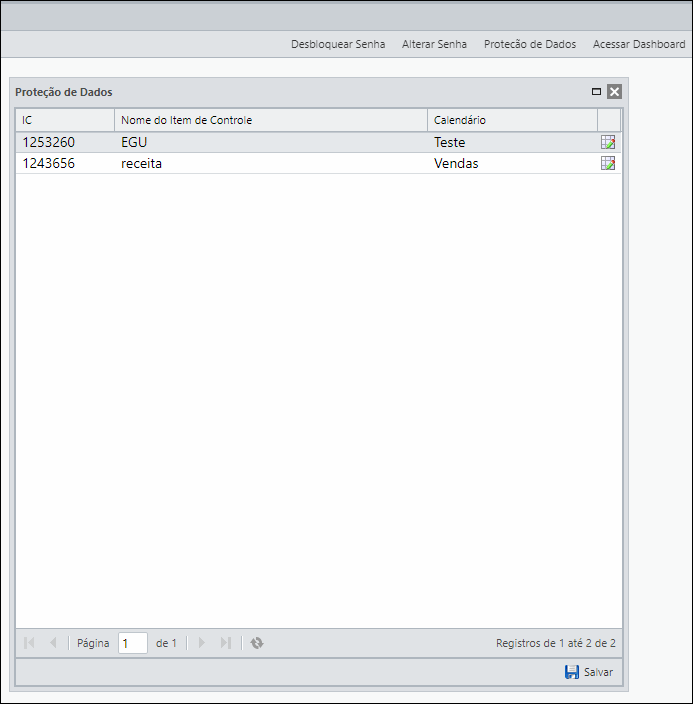
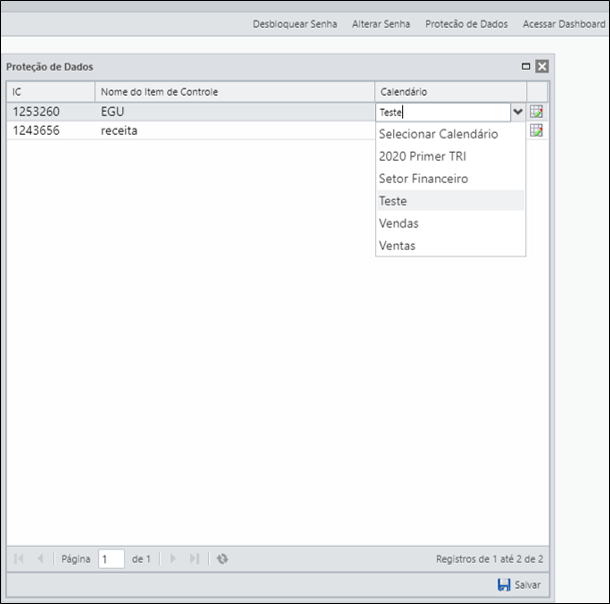
By clicking on the column Calendar, you can change the calendar for the KPI by selecting one of the available calendars.
You can also configure Period Exceptions. Just click ![]() to view the configured exceptions.
to view the configured exceptions.
To learn how to use this feature, see the article: Configuring Exceptions by Period
[/et_pb_tab][/et_pb_tabs][et_pb_text admin_label=”Borda Inferior” _builder_version=”3.27.4″ custom_margin=”10px||40px|” custom_padding=”|25px||25px” box_shadow_style=”preset3″ global_colors_info=”{}”]TESTE[/et_pb_text][et_pb_text admin_label=”Tópico 2″ module_id=”topic_02″ _builder_version=”4.10.4″ text_font=”||||||||” text_letter_spacing=”1px” header_font=”|||||on|||” header_text_color=”#474747″ header_3_font=”|||||on|||” custom_margin=”30px|0px|10px|0px||true” custom_padding=”10px|||10px||false” border_color_all=”#0c71c3″ border_width_bottom=”3px” border_width_left=”3px” global_colors_info=”{}”]
How to Search for Users
[/et_pb_text][et_pb_text _builder_version=”4.10.4″ custom_margin=”|25px|40px|25px||true” custom_padding=”||” global_colors_info=”{}”]By default, on the Search Users screen, you will find a list of all registered users.
You will be able to search the user by Name, Username, Company or by E-mail.

To run the search, just click Search or hit Enter.
To open the registration screen, just double-click on the user you need. By clicking on the icon ![]() you can access directly from the user’s dashboard.
you can access directly from the user’s dashboard.
[/et_pb_text][et_pb_text admin_label=”Borda Inferior” _builder_version=”3.27.4″ custom_margin=”-30px||40px|” custom_padding=”|25px||25px” box_shadow_style=”preset3″ global_colors_info=”{}”]TESTE
[/et_pb_text][et_pb_text admin_label=”Tópico 3″ module_id=”topic_03″ _builder_version=”4.10.4″ text_font=”||||||||” text_letter_spacing=”1px” header_font=”|||||on|||” header_text_color=”#474747″ header_3_font=”|||||on|||” custom_margin=”30px|0px|10px|0px||true” custom_padding=”10px|||10px||false” border_color_all=”#0c71c3″ border_width_bottom=”3px” border_width_left=”3px” global_colors_info=”{}”]
How to Inactivate or Delete Users
[/et_pb_text][et_pb_text ul_item_indent=”30px” _builder_version=”4.10.4″ custom_margin=”|25px|0px|25px||true” custom_padding=”||0px” global_colors_info=”{}”]Inactivate
By opting for inactivation, the user only loses access to the ICG, however, the user’s information and KPIs will be kept. In this case, there will be no impact on Totalizations, Bindings, Delegations, etc.
Inactive Automation
This field causes the user not to be considered in the EGU Report.
Delete
When opting for deletion, in addition to losing access to the ICG, all user registration data and its items will be permanently deleted from the system. In this case, the user’s exclusion will have a direct impact on Totalizations, Links, Delegations, Subordinations, etc.
Therefore, before choosing to delete a user, remove or reorganize:
- all totalizations
- all linkings
- all delegations
- all subordinations
- all pending actions
A good option in these cases is to Move KPIs to other users.
See below how to Inactivate or Delete users:
[/et_pb_text][et_pb_toggle title=”Inactivate User” _builder_version=”4.10.4″ custom_margin=”|30px||25px” custom_padding=”|19px||19px||true” global_colors_info=”{}”]
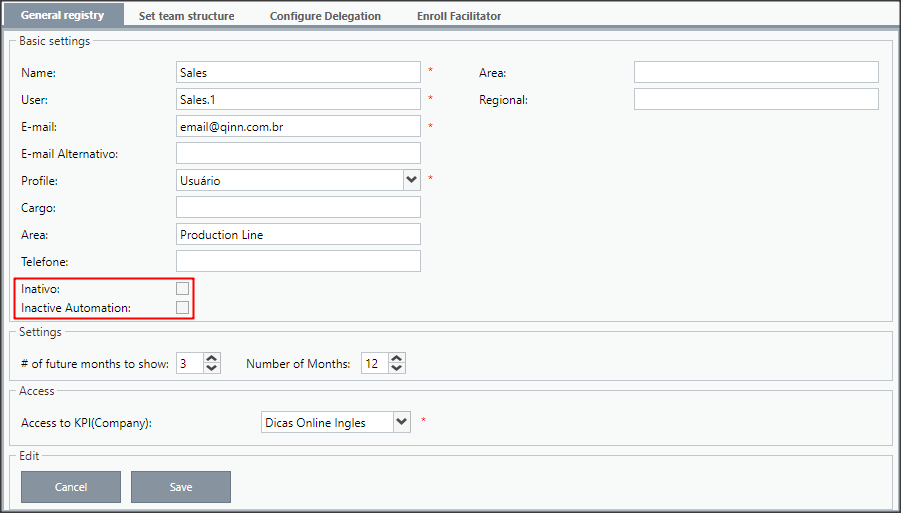
To inactivate a user, just access the registration screen of the user you want and click Inactive.
The same goes for the Inactive Automation option.
[/et_pb_toggle][et_pb_toggle title=”Delete User” _builder_version=”4.10.4″ custom_margin=”-44px|30px|1px|25px” global_colors_info=”{}”]
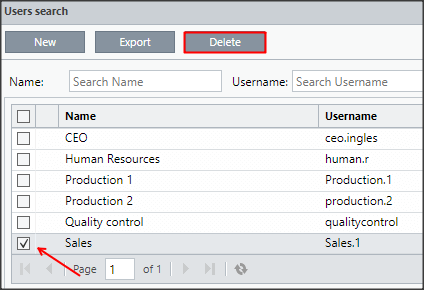
To delete a user, just access the Users screen, click on the checkbox to select the user you want and click on Delete.
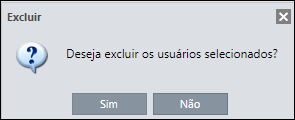
Then just confirm the deletion.
[/et_pb_toggle][et_pb_text admin_label=”Borda Inferior” _builder_version=”3.27.4″ custom_margin=”1px||19px|” custom_padding=”|25px||25px” box_shadow_style=”preset3″ global_colors_info=”{}”]TESTE
[/et_pb_text][et_pb_text admin_label=”Tópico 3″ module_id=”topic_04″ _builder_version=”4.10.4″ text_font=”||||||||” text_letter_spacing=”1px” header_font=”|||||on|||” header_text_color=”#474747″ header_3_font=”|||||on|||” custom_margin=”30px|0px|10px|0px||true” custom_padding=”10px|||10px||false” border_color_all=”#0c71c3″ border_width_bottom=”3px” border_width_left=”3px” global_colors_info=”{}”]
How to Export the User List
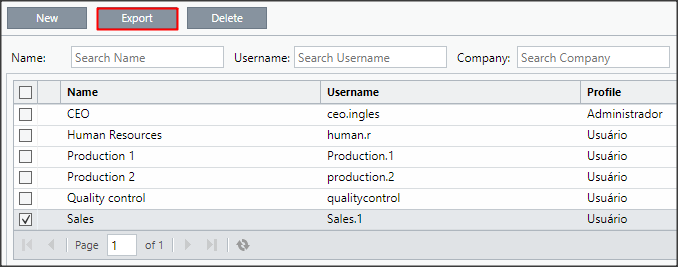
[/et_pb_text][et_pb_text _builder_version=”4.10.4″ custom_margin=”0px|||30px” global_colors_info=”{}”]To export the data of all registered users to Excel, just access the Users screen and click Export.
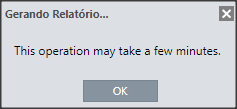
You will receive a notification and shortly thereafter, the file will be automatically downloaded.
When opening the file, you will see all registered data such as Name, User, Email, Subordinate, Company, Sector, Profile etc…

[/et_pb_text][et_pb_text admin_label=”Borda Inferior” _builder_version=”3.27.4″ custom_margin=”-50px||16px|” custom_padding=”|25px||25px” box_shadow_style=”preset3″ global_colors_info=”{}”]TESTE
[/et_pb_text][/et_pb_column][et_pb_column type=”1_5″ _builder_version=”3.25″ custom_padding=”|||” global_colors_info=”{}” custom_padding__hover=”|||”][et_pb_image src=”https://suporte.quattrus.com/wp-content/uploads/2022/04/FICOU-COM-DUVIDAS-ING2533.png” title_text=”FICOU COM DÚVIDAS ING%912533%93″ align_tablet=”center” align_phone=”” align_last_edited=”on|desktop” disabled_on=”on|on|” admin_label=”ESP – Banner – Contato Suporte” _builder_version=”4.14.8″ z_index=”0″ hover_enabled=”0″ always_center_on_mobile=”on” saved_tabs=”all” locked=”off” global_colors_info=”{}” sticky_enabled=”0″][/et_pb_image][/et_pb_column][/et_pb_row][/et_pb_section]


 Português