Related Posts
[/et_pb_text][/et_pb_column][et_pb_column type=”3_5″ _builder_version=”3.25″ custom_padding=”|||” global_colors_info=”{}” custom_padding__hover=”|||”][et_pb_post_title meta=”off” featured_image=”off” _builder_version=”3.19.18″ title_font=”|700||||on|||” title_font_size=”36px” border_width_bottom=”5″ border_color_bottom=”#0c71c3″ global_colors_info=”{}”][/et_pb_post_title][et_pb_text admin_label=”Info” _builder_version=”4.9.10″ text_font=”||on||||||” text_font_size=”12px” text_letter_spacing=”1px” text_line_height=”1.5em” custom_margin=”-40px|0px||” custom_margin_tablet=”-20px|||” custom_margin_phone=”” custom_margin_last_edited=”on|phone” custom_padding=”0px|0px||” z_index_tablet=”500″ global_colors_info=”{}” custom_margin__hover_enabled=”on” custom_margin__hover=”-40px|0px||”]
The Data Protection serves to block the editing of KPIs information after a stipulated date. A deadline can be defined for editing the Measurements, FCAs, Pareto and KPI Registration.
[/et_pb_text][et_pb_text admin_label=”Lista de tópicos” _builder_version=”4.9.10″ max_width=”80%” module_alignment=”center” custom_margin=”-20px||0px|” custom_margin_tablet=”0px||” custom_margin_phone=”” custom_margin_last_edited=”on|phone” custom_padding=”20px||0px|25px” border_radii=”on|15px|15px|15px|15px” border_width_all=”1px” border_color_all=”#d6d6d6″ box_shadow_style=”preset1″ global_colors_info=”{}”]- In this article we will see:
TIP:
Before registering a Data Protection, it is important that you have an Information Security Policy, as you will be able to create several calendars reflecting this policy in different areas, users and KPIs.
To learn how to add users and/or KPIs to a calendar, visit the article: Data Protection: Settings
[/et_pb_text][et_pb_text admin_label=”Tópico 1″ module_id=”topic_01″ _builder_version=”4.9.10″ text_font=”||||||||” text_letter_spacing=”1px” header_font=”|||||on|||” header_text_color=”#474747″ header_3_font=”|||||on|||” custom_margin=”30px|0px|10px|0px||true” custom_padding=”10px|||10px||false” border_color_all=”#0c71c3″ border_width_bottom=”3px” border_width_left=”3px” global_colors_info=”{}”]
How to Register Data Protection
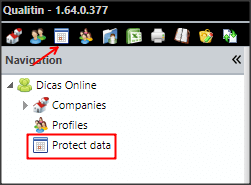
[/et_pb_text][et_pb_text _builder_version=”4.9.10″ custom_margin=”|25px|0px|25px||true” custom_padding=”||0px” global_colors_info=”{}”]To create a new calendar, click on Protect Data, both in the top menu and in the side menu of the ICG.
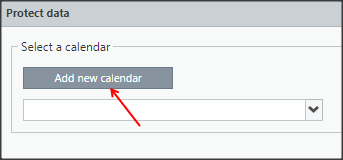
Then click Add New Calendar.
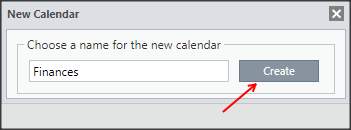
Define the name of the new calendar and click Create.
Then complete the configuration of the new calendar by filling in the fields on the Basic Data, Permissions and Edit Period tabs.
TIPS:
- We recommend that you enter the name of the Customer, Company, Area, or Security Policy that the calendar refers to.
- We do not recommend using the Year as the calendar name, because for each calendar created, the blocking dates must be configured for each year in which the protection is in effect.
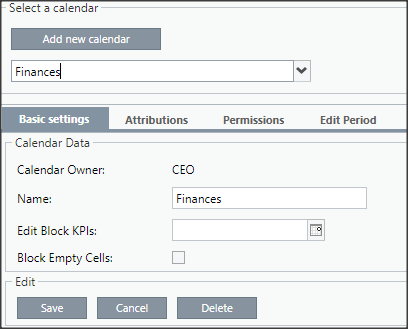
On this tab, you can check the Calendar Owner (the user who created the calendar) and you can also edit the name of the created calendar and configure the Block Editing KPIs and Block Empty Cells fields.
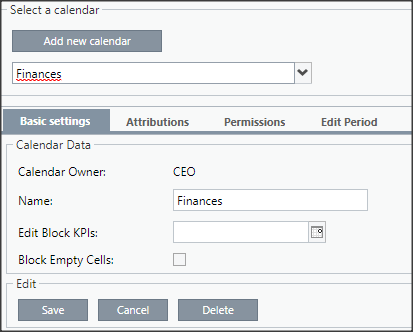
- Block editing KPIs: disables the editing of fields on the KPI Registration screen as of the specified date
- Block Empty Cells: in addition to blocking fields with values on the measurement screen, it also blocks unfilled fields, such as Red Band, Comments, etc.
In this tab, you can define which users will be part of the created calendar.

Just select the user on the left side and click Add User to move it to the right side.
IMPORTANT: Only users with registered control items can be assigned to a data protection.
If you prefer, you can click Add Structure to give permission to the selected user and their subordinates.

To remove a user from this calendar just click ![]() on the selected user.
on the selected user.
On this tab you can indicate which users are allowed to edit this calendar.

To add this permission to one or more users, just click Add to move the allowed users from the Users column to the Allowed Users column.
To remove this permission, just click Remove to move users from the Allowed Users column to the Users column.
You can also use the All button to either add or remove all users.
“]
On this tab you can indicate which users are allowed to edit this calendar.
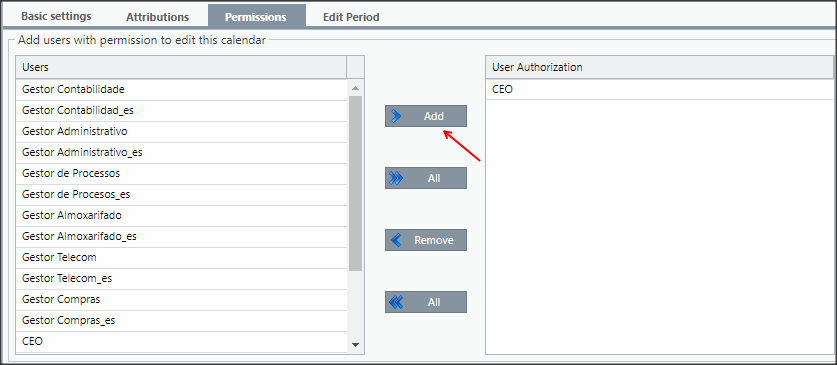
To add this permission to one or more users, just click Add to move the allowed users from the Users column to the Allowed Users column.
To remove this permission, just click Remove to move users from the Allowed Users column to the Users column.
You can also use the All button to either add or remove all users.
[/et_pb_tab][et_pb_tab title=”Edit Period” _builder_version=”4.10.4″ _module_preset=”default” global_colors_info=”{}”]
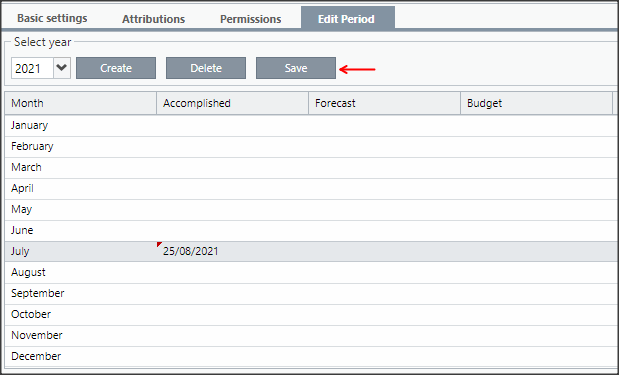
On this tab, you can define the dates on which the system should block the fields on the Measurements, FCA and Pareto screens.
Click Create to define a new period.
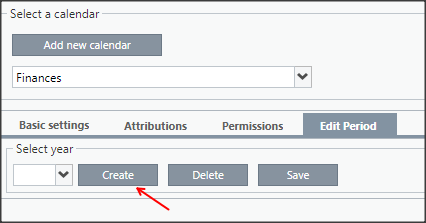
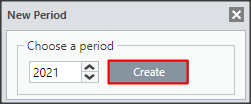
Then define the desired year and click Create.
Now you can fill in the blackout dates in each of the fields in the respective months.
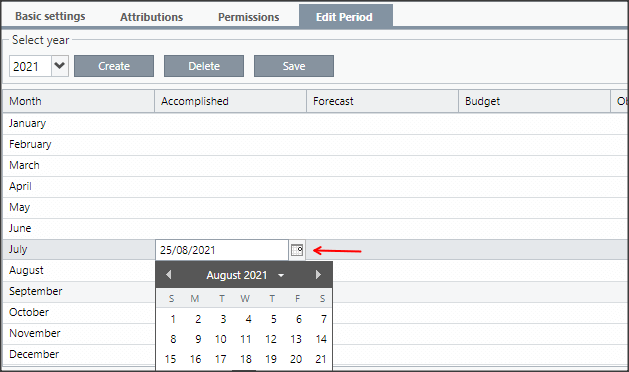
You can select the date on the calendar, enter it manually and also copy and paste the entered date.
At the end, click on Save.
[/et_pb_tab][/et_pb_tabs][et_pb_text admin_label=”Borda Inferior” _builder_version=”3.27.4″ custom_margin=”-13px||40px|” custom_padding=”|25px||25px” box_shadow_style=”preset3″ global_colors_info=”{}”]TESTE
[/et_pb_text][et_pb_text admin_label=”Tópico 2″ module_id=”topic_02″ _builder_version=”4.9.10″ text_font=”||||||||” text_letter_spacing=”1px” header_font=”|||||on|||” header_text_color=”#474747″ header_3_font=”|||||on|||” custom_margin=”30px|0px|10px|0px||true” custom_padding=”10px|||10px||false” border_color_all=”#0c71c3″ border_width_bottom=”3px” border_width_left=”3px” global_colors_info=”{}”]
How to View Data Protection
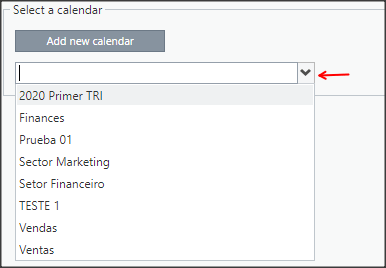
[/et_pb_text][et_pb_text _builder_version=”4.10.4″ text_font=”||||||||” custom_margin=”0px|25px||25px” global_colors_info=”{}”]To view an existing calendar, select a calendar from the list.
When selecting a calendar, you will see Basic Data for the selected calendar.
By clicking on the tabs Assignments, Permissions and Edit Period you will see all the details of the configured calendar.
[/et_pb_text][et_pb_text _builder_version=”4.9.10″ background_color=”rgba(70,147,42,0.27)” custom_margin=”15px|70px|50px|70px|false|false” custom_padding=”10px|15px|10px|20px|true” border_width_left=”5px” border_color_left=”rgba(0,48,3,0.34)” box_shadow_style=”preset3″ saved_tabs=”all” global_colors_info=”{}”]REMINDER:
- A user can be part of multiple calendars, however, each KPI can be part of only one calendar;
- To learn how to add users and KPI to a calendar, go to the article: Data Protection: Settings
[/et_pb_text][et_pb_text admin_label=”Borda Inferior” _builder_version=”4.7.7″ custom_margin=”||50px||false|false” custom_padding=”|25px||25px” box_shadow_style=”preset3″ global_colors_info=”{}”]TESTE
[/et_pb_text][et_pb_text admin_label=”Tópico 3″ module_id=”topic_03″ _builder_version=”4.9.10″ text_font=”||||||||” text_letter_spacing=”1px” header_font=”|||||on|||” header_text_color=”#474747″ header_3_font=”|||||on|||” custom_margin=”30px|0px|10px|0px||true” custom_padding=”10px|||10px||false” border_color_all=”#0c71c3″ border_width_bottom=”3px” border_width_left=”3px” global_colors_info=”{}”]
How to Delete Data Protection
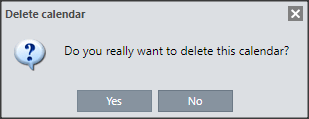
[/et_pb_text][et_pb_text _builder_version=”4.10.4″ custom_margin=”|25px|0px|25px||true” custom_padding=”||0px” global_colors_info=”{}”]To delete a calendar, simply go to the Basic Data tab of the selected calendar and click Delete.
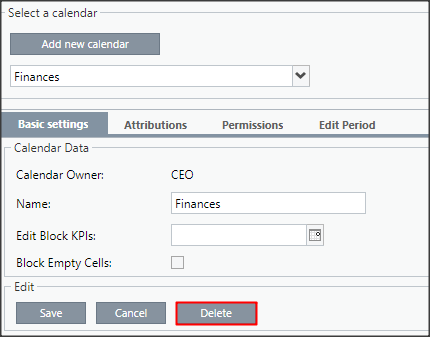
To confirm the deletion, click Yes.
[/et_pb_text][/et_pb_column][et_pb_column type=”1_5″ _builder_version=”3.25″ custom_padding=”|||” global_colors_info=”{}” custom_padding__hover=”|||”][et_pb_image src=”https://suporte.quattrus.com/wp-content/uploads/2022/04/FICOU-COM-DUVIDAS-ING2533.png” title_text=”FICOU COM DÚVIDAS ING%912533%93″ align_tablet=”center” align_phone=”” align_last_edited=”on|desktop” disabled_on=”on|on|” admin_label=”ESP – Banner – Contato Suporte” _builder_version=”4.14.8″ z_index=”0″ hover_enabled=”0″ always_center_on_mobile=”on” saved_tabs=”all” locked=”off” global_colors_info=”{}” sticky_enabled=”0″][/et_pb_image][/et_pb_column][/et_pb_row][/et_pb_section]


 Português