Related Posts
[/et_pb_text][/et_pb_column][et_pb_column type=”3_5″ _builder_version=”3.25″ custom_padding=”|||” global_colors_info=”{}” custom_padding__hover=”|||”][et_pb_post_title meta=”off” featured_image=”off” _builder_version=”3.19.18″ title_font=”|700||||on|||” title_font_size=”36px” border_width_bottom=”5″ border_color_bottom=”#0c71c3″ global_colors_info=”{}”][/et_pb_post_title][et_pb_text admin_label=”Info” _builder_version=”4.9.10″ text_font=”||on||||||” text_font_size=”12px” text_letter_spacing=”1px” text_line_height=”1.5em” custom_margin=”-40px|0px||” custom_margin_tablet=”-20px|||” custom_margin_phone=”” custom_margin_last_edited=”on|phone” custom_padding=”0px|0px||” z_index_tablet=”500″ global_colors_info=”{}” custom_margin__hover_enabled=”on” custom_margin__hover=”-40px|0px||”]
This ICG functionality allows Facilitators to have a tree separate from the reporting structure. In this way, Facilitators will be able to directly access their Facilitators regardless of their position in the hierarchy.
[/et_pb_text][et_pb_text admin_label=”Lista de tópicos” _builder_version=”4.9.10″ max_width=”80%” module_alignment=”center” custom_margin=”-20px||20px||false|false” custom_margin_tablet=”0px||” custom_margin_phone=”” custom_margin_last_edited=”on|phone” custom_padding=”20px||0px|25px|false|false” border_radii=”on|15px|15px|15px|15px” border_width_all=”1px” border_color_all=”#d6d6d6″ box_shadow_style=”preset1″ global_colors_info=”{}”]In this article we will see:
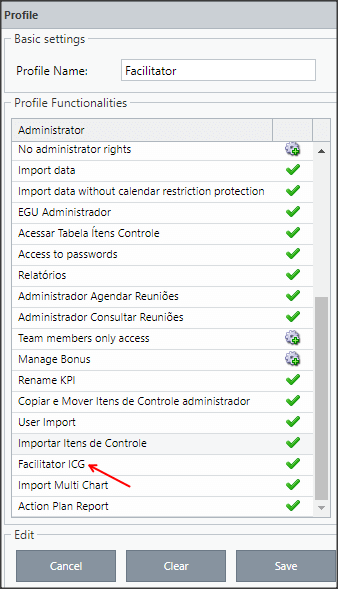
First, to use this feature, the user must have the ICG Facilitator permission enabled in their profile.
Linking the Facilitator to the Facilitated
[/et_pb_text][et_pb_text _builder_version=”4.10.4″ custom_margin=”20px|25px|0px|25px|false|true” custom_padding=”||0px” global_colors_info=”{}”]On the Users screen, click on the Register Facilitator tab.

Click on the Facilitator Registration tab
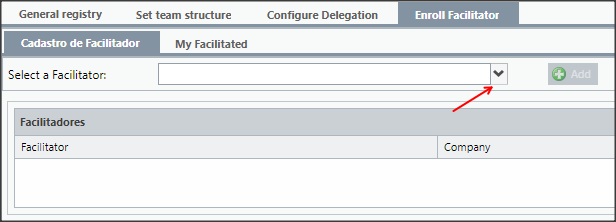
Then, click Add
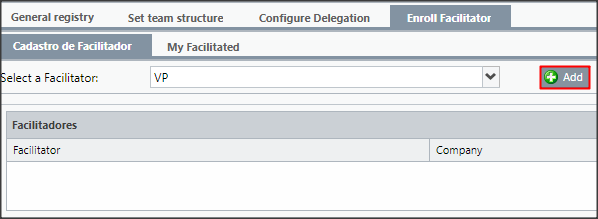
Once this is done, the user will be listed on the screen.

To unlink the Facilitator, just click on the icon![]()
[/et_pb_text][et_pb_text admin_label=”Tópico 2″ module_id=”topic_02″ _builder_version=”4.9.10″ text_font=”||||||||” text_letter_spacing=”1px” header_font=”|||||on|||” header_text_color=”#474747″ header_3_font=”|||||on|||” custom_margin=”30px|0px|10px|0px||true” custom_padding=”10px|||10px||false” border_color_all=”#0c71c3″ border_width_bottom=”3px” border_width_left=”3px” global_colors_info=”{}”]
Linking Facilitated to the Facilitator
[/et_pb_text][et_pb_text _builder_version=”4.10.4″ custom_margin=”20px|25px|0px|25px|false|true” custom_padding=”||0px” global_colors_info=”{}”]Click on the My Facilitators tab

Then, click Add
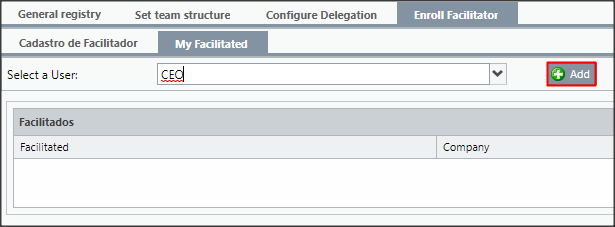
Once this is done, the user will be listed on the screen.

To add more Facilitated, just repeat the steps above. To unlink the Facilitated, just click on the icon ![]()
[/et_pb_text][et_pb_text _builder_version=”4.9.10″ header_font=”||||||||” background_color=”rgba(70,147,42,0.27)” custom_margin=”20px|15px|30px|70px|false|false” custom_padding=”20px|15px|20px|20px|true|false” border_width_left=”5px” border_color_left=”rgba(0,48,3,0.34)” box_shadow_style=”preset3″ saved_tabs=”all” global_colors_info=”{}”]
REMINDER:
The Facilitator Registration tab allows you to link a Facilitator to the selected user.
A aba Meus Facilitados permite vincular os Facilitados ao usuário selecionado.
The My Facilitators tab allows you to link the Facilitated to the selected user.
[/et_pb_text][et_pb_text admin_label=”Borda Inferior” _builder_version=”3.27.4″ custom_margin=”10px||40px|” custom_padding=”|25px||25px” box_shadow_style=”preset3″ global_colors_info=”{}”]TESTE[/et_pb_text][et_pb_text admin_label=”Tópico 3″ module_id=”topic_03″ _builder_version=”4.9.10″ text_font=”||||||||” text_letter_spacing=”1px” header_font=”|||||on|||” header_text_color=”#474747″ header_3_font=”|||||on|||” custom_margin=”30px|0px|10px|0px||true” custom_padding=”10px|||10px||false” border_color_all=”#0c71c3″ border_width_bottom=”3px” border_width_left=”3px” global_colors_info=”{}”]
My Facilitated
[/et_pb_text][et_pb_text ul_item_indent=”30px” _builder_version=”4.10.4″ custom_margin=”|25px|0px|25px||true” custom_padding=”||0px” global_colors_info=”{}”]When logging into the ICG as a Facilitator, you will have a new option to access your facilitated: the button My Facilitated located in the side menu, below the hierarchical tree of Companies and Users.
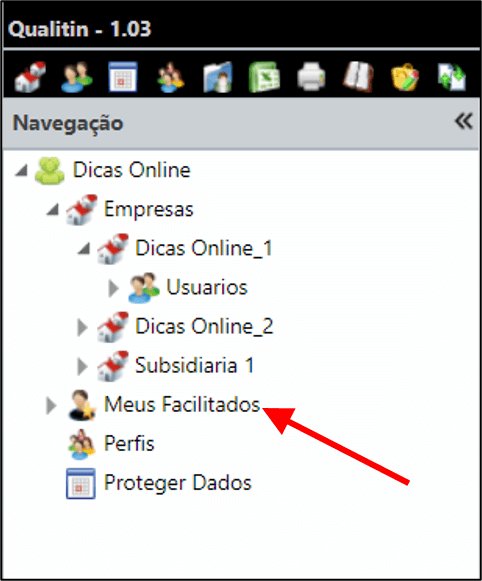
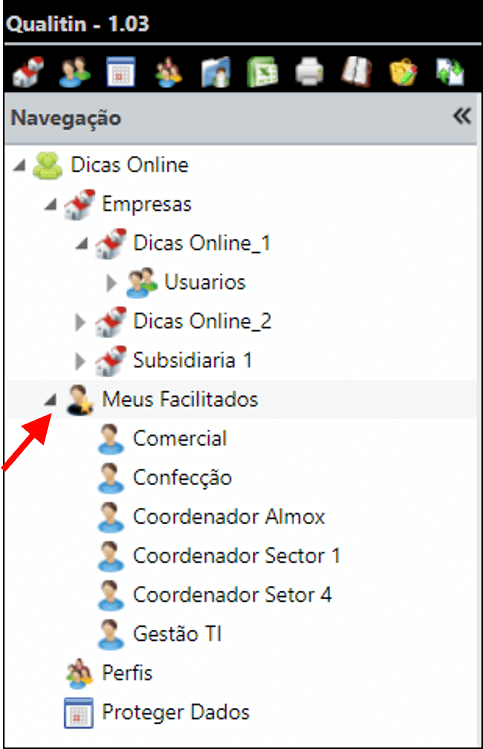
By clicking on the arrow, the Facilitator will be able to visualize all the users he assists.
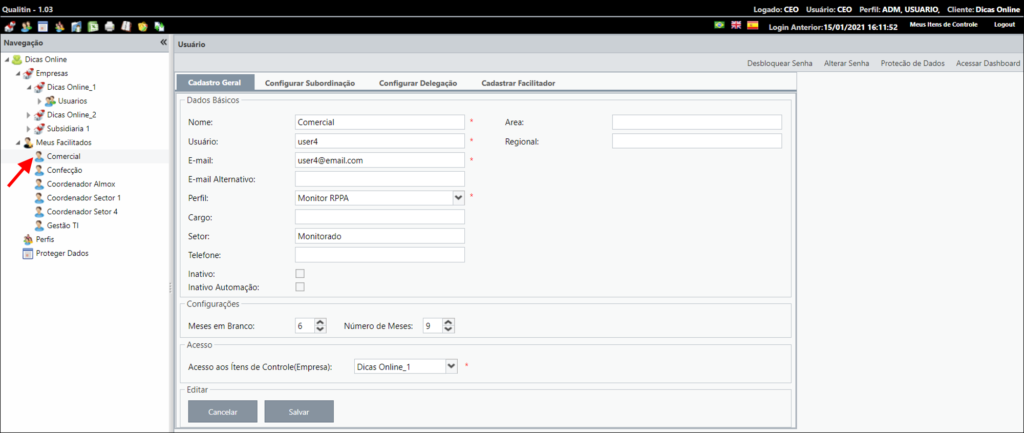
By clicking on one of the users in this list, you will be able to directly access the user’s registration screen.
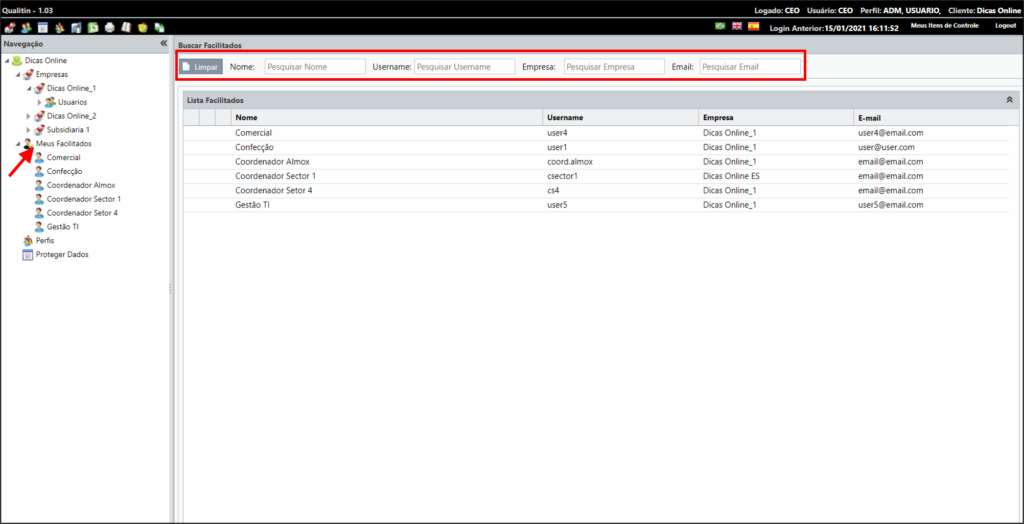
By clicking on My Facilitated, you will enter the Facilitated Search screen, where, as well as on the Users screen, you will have the complete list of all your facilitated ones.
On this screen, you can search for a facilitated by Name, Username, Company and Email.
By hovering over a record you will have three options: Edit, Change Password and Access Dashboard.
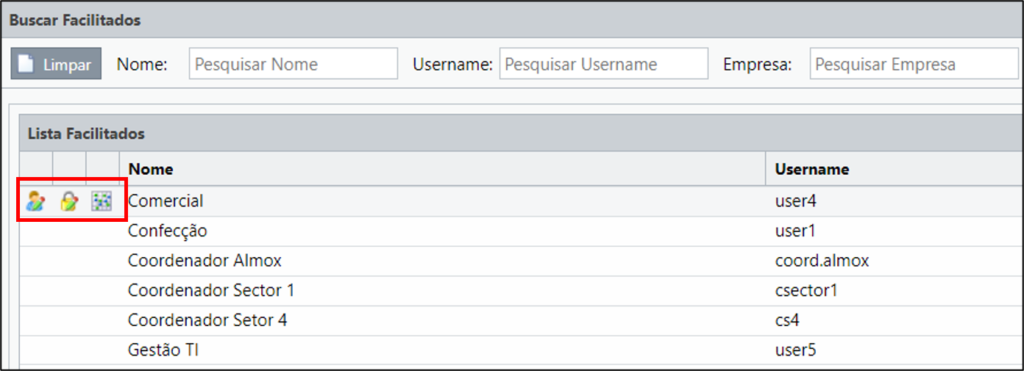
- Edit: opens the user registration screen
- Change Password: opens the screen for changing the user’s password
- Access Dashboard: access the user’s dashboard
IMPORTANT:
To perform all of the above operations, make sure the Facilitator has all the necessary permissions in his/her profile.
[/et_pb_text][et_pb_text admin_label=”Borda Inferior” _builder_version=”3.27.4″ custom_margin=”10px||40px|” custom_padding=”|25px||25px” box_shadow_style=”preset3″ global_colors_info=”{}”]TESTE[/et_pb_text][et_pb_text admin_label=”Tópico 4″ module_id=”topic_04″ _builder_version=”4.10.4″ text_font=”||||||||” text_letter_spacing=”1px” header_font=”|||||on|||” header_text_color=”#474747″ header_3_font=”|||||on|||” custom_margin=”30px|0px|10px|0px||true” custom_padding=”10px|||10px||false” border_color_all=”#0c71c3″ border_width_bottom=”3px” border_width_left=”3px” global_colors_info=”{}”]
Generating the Facilitators’ EGU
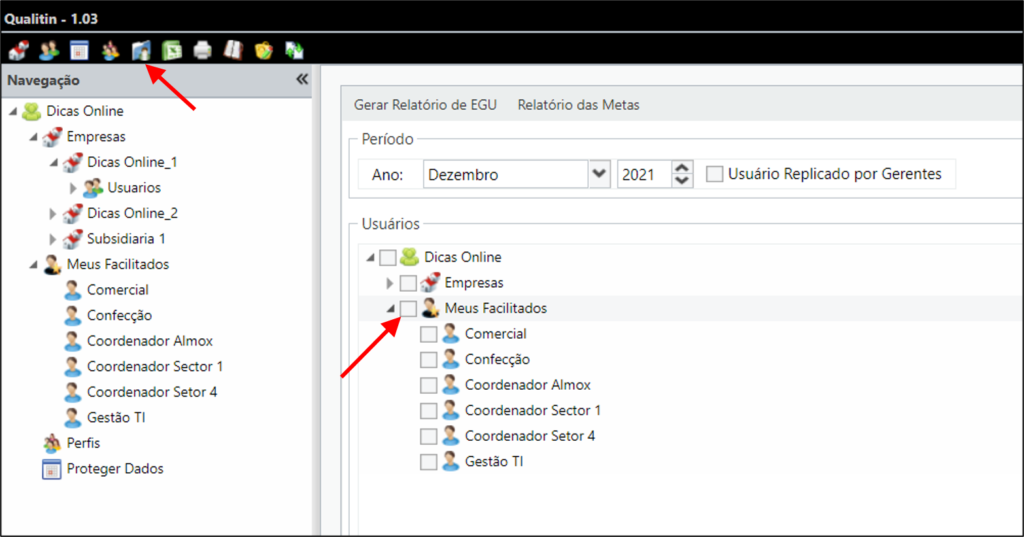
[/et_pb_text][et_pb_text _builder_version=”4.10.4″ custom_margin=”0px|||30px” global_colors_info=”{}”]In addition to accessing and managing its facilitated, the Facilitator may also extract the EGU only from its facilitated.
For this, when accessing the EGU screen, you will see the list of your facilitated by clicking on My Facilitated, below the hierarchical tree of Companies and Users.
[/et_pb_text][et_pb_text admin_label=”Borda Inferior” _builder_version=”3.27.4″ custom_margin=”-46px||40px|” custom_padding=”|25px||25px” box_shadow_style=”preset3″ global_colors_info=”{}”]TESTE
[/et_pb_text][/et_pb_column][et_pb_column type=”1_5″ _builder_version=”3.25″ custom_padding=”|||” global_colors_info=”{}” custom_padding__hover=”|||”][et_pb_image src=”https://suporte.quattrus.com/wp-content/uploads/2022/04/FICOU-COM-DUVIDAS-ING2533.png” title_text=”FICOU COM DÚVIDAS ING%912533%93″ align_tablet=”center” align_phone=”” align_last_edited=”on|desktop” disabled_on=”on|on|” admin_label=”ESP – Banner – Contato Suporte” _builder_version=”4.14.8″ z_index=”0″ hover_enabled=”0″ always_center_on_mobile=”on” saved_tabs=”all” locked=”off” global_colors_info=”{}” sticky_enabled=”0″][/et_pb_image][/et_pb_column][/et_pb_row][/et_pb_section]


 Português
 Español