

 Español
 English
Artigos Relacionados
[/et_pb_text][/et_pb_column][et_pb_column type=”3_5″ _builder_version=”3.25″ custom_padding=”|||” global_colors_info=”{}” custom_padding__hover=”|||”][et_pb_post_title meta=”off” featured_image=”off” _builder_version=”3.17.6″ title_font=”|700||||on|||” title_font_size=”36px” global_colors_info=”{}”] [/et_pb_post_title][et_pb_tabs _builder_version=”4.4.8″ global_colors_info=”{}”][et_pb_tab title=”Inserir Manualmente” _builder_version=”4.4.8″ global_colors_info=”{}”]
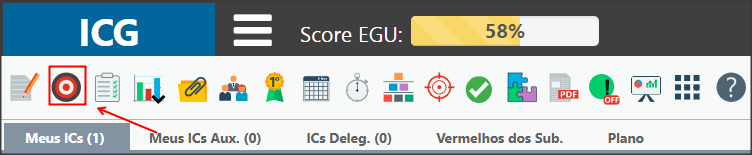
Para inserir manualmente, basta clicar no segundo botão do menu, como indicado abaixo:
Você será redirecionado para a tela de medições.
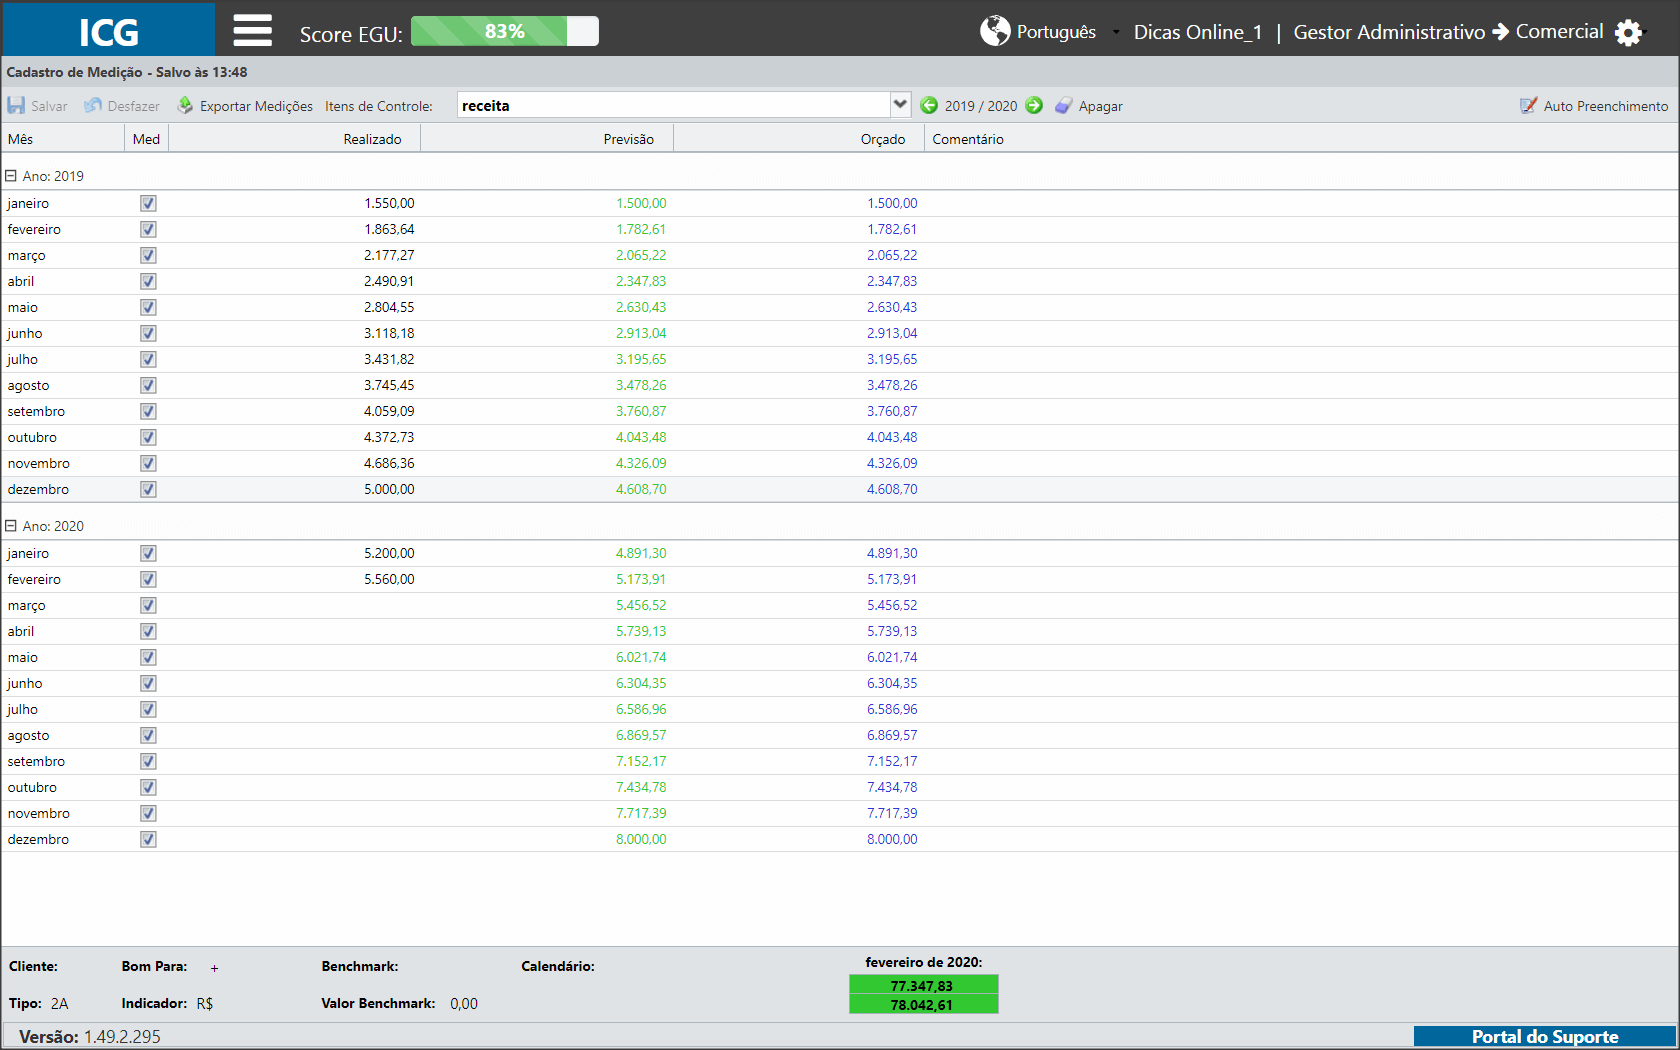
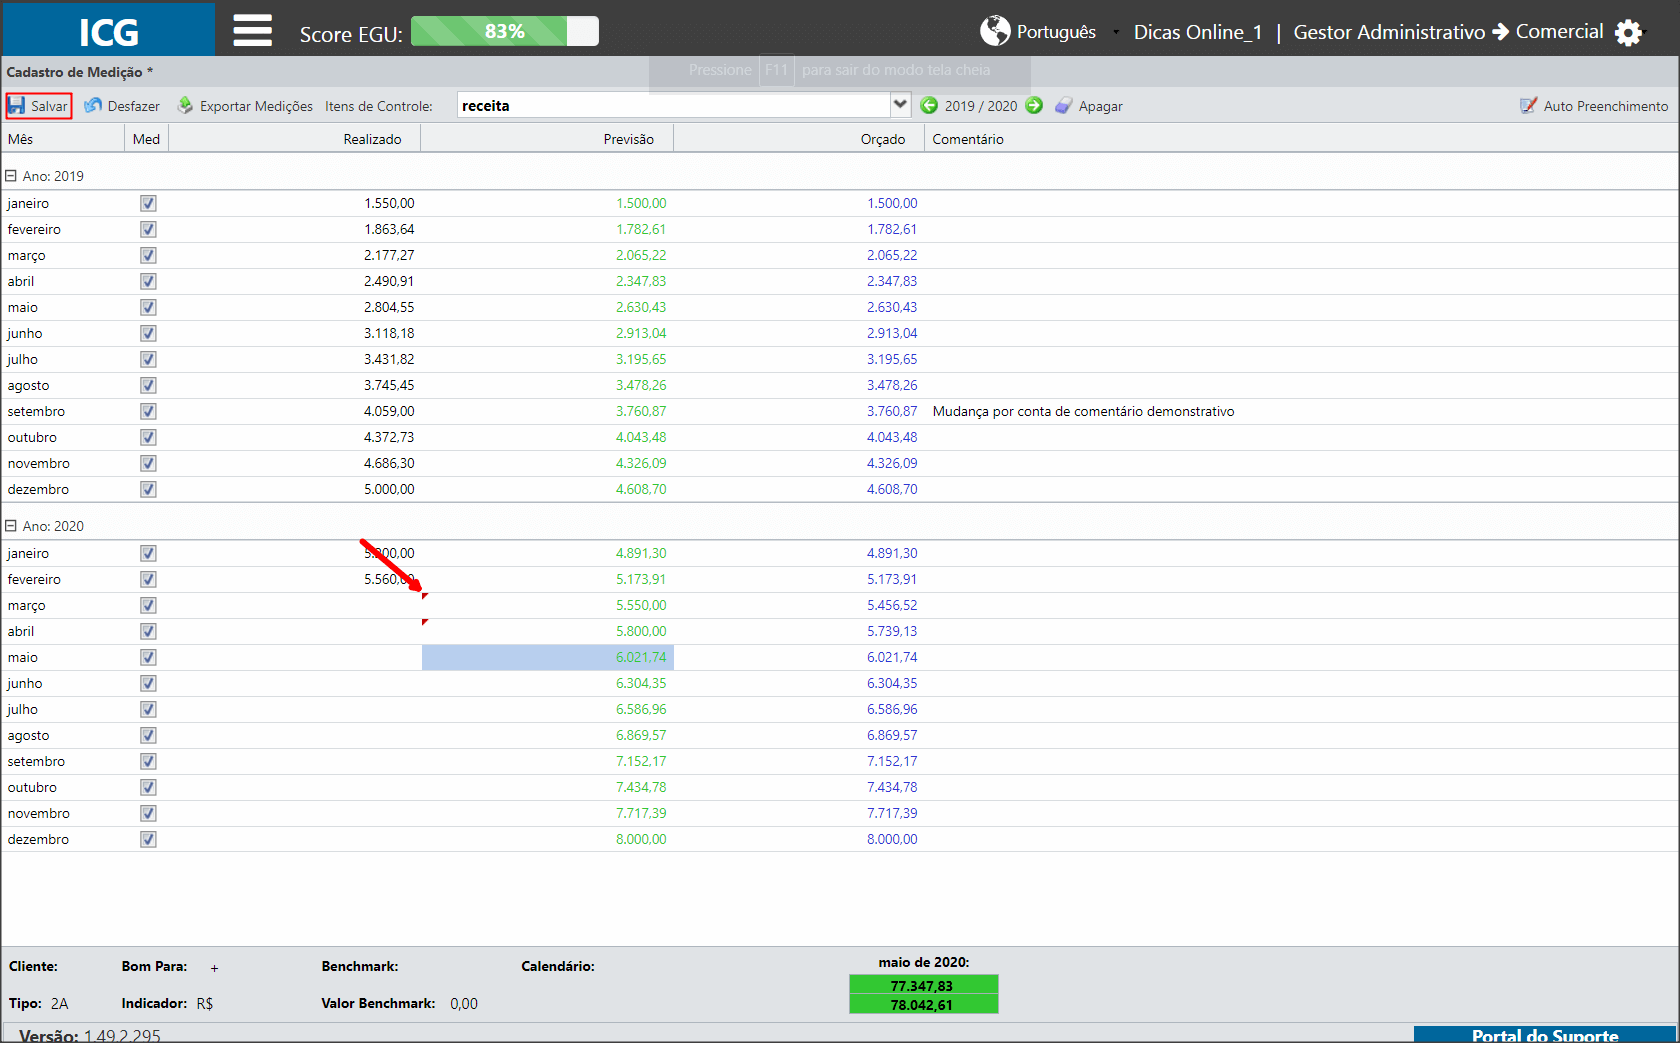
Basta inserir o valor no campo desejado. Quando os valores estiverem com a seta vermelha (indicado abaixo), significa que aqueles dados ainda não foram computados, sendo necessário salvar. Para isto, basta clicar no botão Salvar.
Você também poderá definir quais os meses serão medidos. Por padrão, todos os meses virão marcados como medidos, mas alguns itens não são medidos todos os meses.
Basta desmarcar o check box da coluna Med. Dessa forma, o ICG não contabilizará o mês para os cálculos de Faixa Verde e Meta.
Você poderá inserir comentários nos meses, como indicado pela seta.

Neste menu, você também pode:

- Salvar os valores digitados;
- Desfazer as últimas alterações;
- Exportar as medições do item;
- Alternar entre itens de controle;
- Alternar entre anos de medições;
- Apagar suas medições;
- Auto Preenchimento (saiba mais em Função Auto Preenchimento).
Você também poderá inserir valores diretamente no Dashboard. Para isso, basta clicar duas vezes no farol do mês desejado. O sistema abrirá a janela de edição, conforme abaixo:
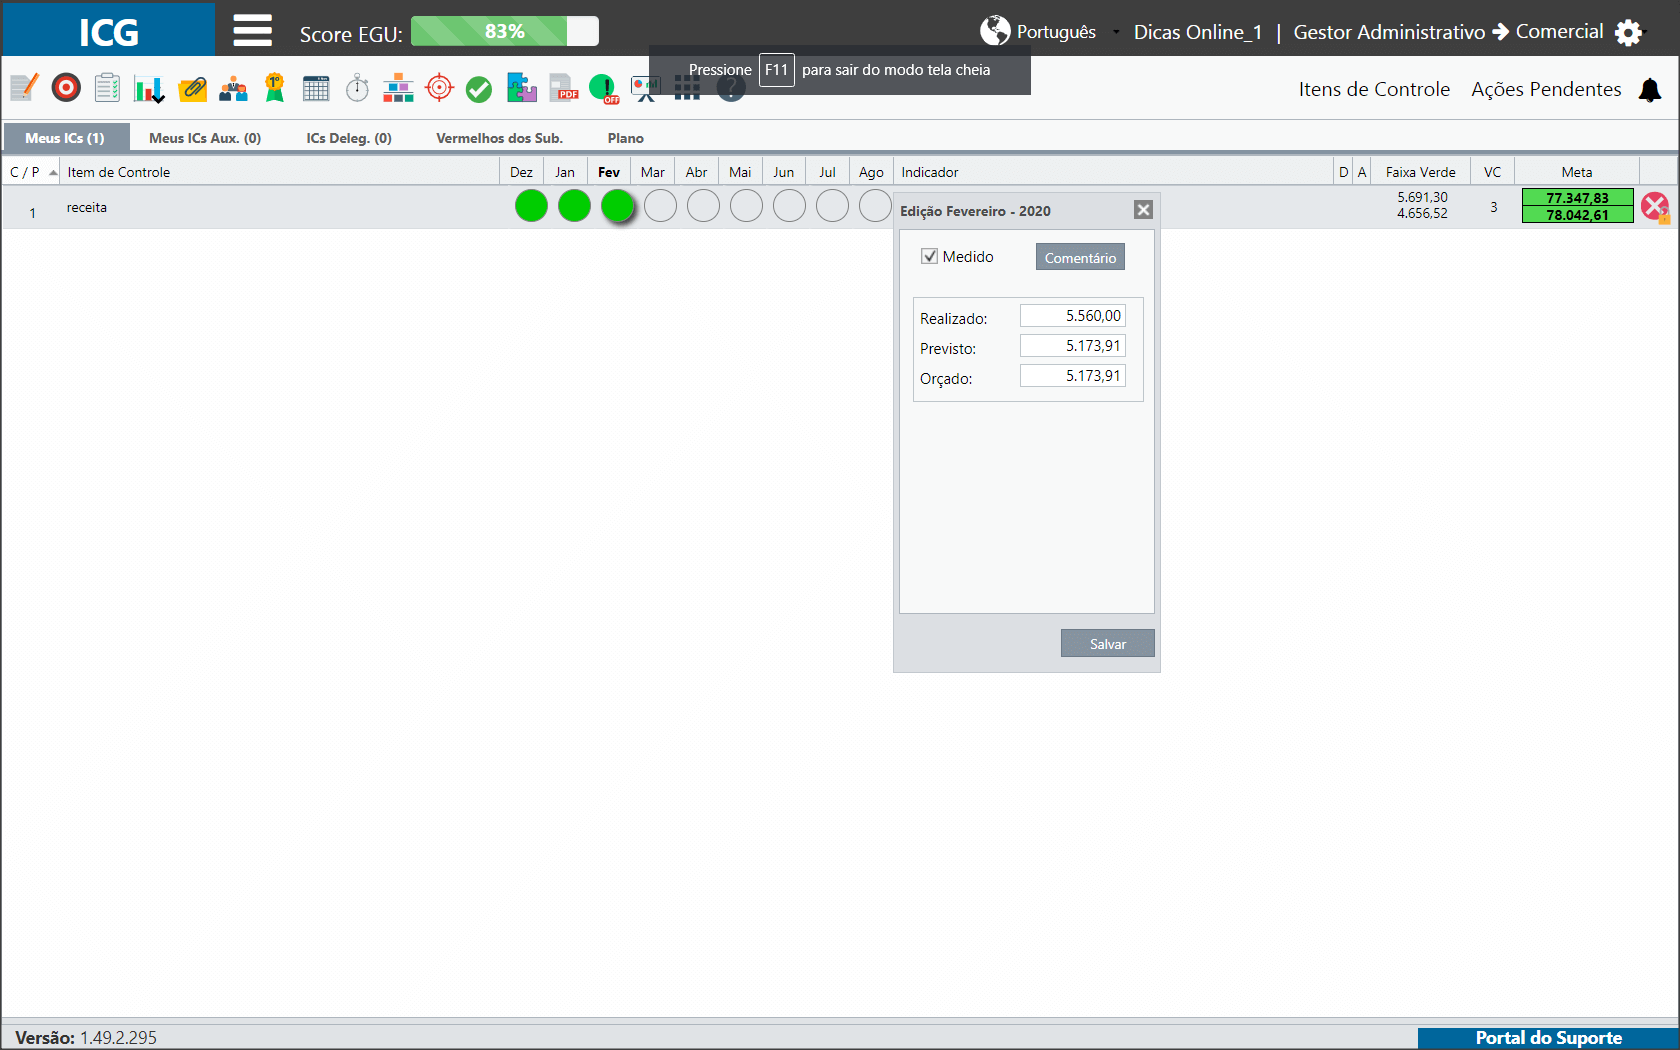
Você poderá inserir valores ou realizar alguma alteração.
Assim como na tela de Medições, você poderá escrever um comentário e desmarcar o check box de medição para o mês.
Após finalizar, clique em Salvar.
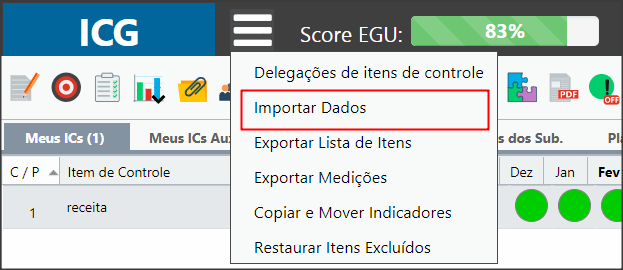
[/et_pb_tab][et_pb_tab title=”Inserir por Importação” _builder_version=”4.4.0″ global_colors_info=”{}”]Para importar medições no perfil do usuário, clique no ícone indicado pelo número 1 e depois selecione a opção “Importar Dados”.
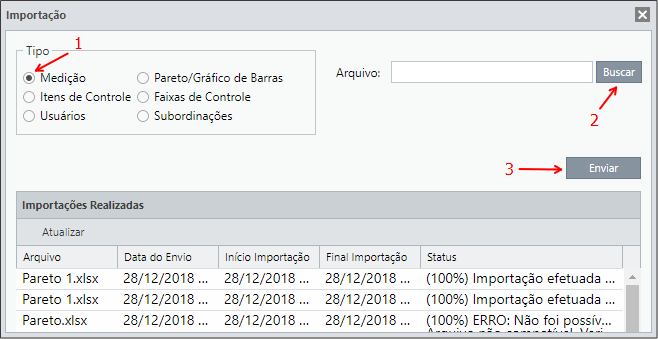
A seguir, selecione o tipo “Medições”, em seguida busque o arquivo no seu computador e clique em Enviar. Conforme imagem abaixo:
IMPORTANTE:
Tenha certeza de estar importando um arquivo de excel e dentro dos padrões de importação! A planilha não pode conter nenhum filtro ou fórmulas. Os formatos válidos são: .xls, .xlsx, .csv
Você pode clicar no botão “Atualizar” para ver o status de envio do arquivo. Quando estiver pronto, no status aparecerá a mensagem: (100%) Importação efetuada com sucesso.
Para obter a Máscara de Importação e as Instruções de Preenchimento do arquivo, acesse o artigo Importar Medições pelo perfil do Usuário.
[/et_pb_tab][/et_pb_tabs][et_pb_text _builder_version=”3.27.4″ background_color=”rgba(70,168,201,0.34)” custom_margin=”|15px||15px” custom_padding=”10px|15px|10px|20px|true” border_width_left=”5px” border_color_left=”rgba(32,159,201,0.59)” box_shadow_style=”preset3″ saved_tabs=”all” locked=”off” global_colors_info=”{}”]IMPORTANTE:
Em Itens do tipo 1C, o usuário deverá cadastrar as faixas de acordo com o Bom Para.
1. IC bom para MENOS (-): o usuário deverá cadastrar a Faixa Verde e Meta SUPERIOR, necessariamente.
2. IC bom para MAIS (+): o usuário deverá cadastrar a Faixa Verde e Meta INFERIOR, necessariamente.
Essa configuração é determinando para que o ICG faça a coloração dos faróis e metas corretamente.
[/et_pb_text][/et_pb_column][et_pb_column type=”1_5″ _builder_version=”3.25″ custom_padding=”|||” global_colors_info=”{}” custom_padding__hover=”|||”][et_pb_image src=”https://suporte.quattrus.com/wp-content/uploads/2019/02/banner-suporte-01.png” title_text=”banner-suporte-01″ align_tablet=”center” align_phone=”” align_last_edited=”on|desktop” disabled_on=”on|on|” admin_label=”ESP – Banner – Contato Suporte” _builder_version=”4.14.4″ z_index=”0″ always_center_on_mobile=”on” global_module=”10498″ saved_tabs=”all” locked=”off” global_colors_info=”{}”][/et_pb_image][/et_pb_column][/et_pb_row][et_pb_row column_structure=”1_5,1_5,1_5,1_5,1_5″ disabled_on=”on|on|” module_class=” et_pb_row_fullwidth” _builder_version=”3.25″ width=”89%” width_tablet=”80%” width_phone=”” width_last_edited=”on|desktop” max_width=”89%” max_width_tablet=”80%” max_width_phone=”” max_width_last_edited=”on|desktop” make_fullwidth=”on” global_colors_info=”{}”][et_pb_column type=”1_5″ _builder_version=”3.25″ custom_padding=”|||” global_colors_info=”{}” custom_padding__hover=”|||”][/et_pb_column][et_pb_column type=”1_5″ _builder_version=”3.25″ custom_padding=”|||” global_colors_info=”{}” custom_padding__hover=”|||”][et_pb_button button_url=”https://suporte.quattrus.com/passo-4-cadastrando-itens-de-controle/” button_text=”ANTERIOR” button_alignment=”left” _builder_version=”3.19.17″ custom_button=”on” button_text_size=”14px” button_text_color=”#434343″ button_bg_color=”#f0f0f0″ button_border_width=”1px” button_border_color=”#dddddd” button_use_icon=”off” global_colors_info=”{}”] [/et_pb_button][/et_pb_column][et_pb_column type=”1_5″ _builder_version=”3.25″ custom_padding=”|||” global_colors_info=”{}” custom_padding__hover=”|||”][et_pb_text _builder_version=”3.27.4″ text_text_color=”#6b6b6b” text_letter_spacing=”4px” text_orientation=”center” custom_margin=”|-73px||-73px” global_colors_info=”{}”] [/et_pb_text][/et_pb_column][et_pb_column type=”1_5″ _builder_version=”3.25″ custom_padding=”|||” global_colors_info=”{}” custom_padding__hover=”|||”][et_pb_button button_url=”https://suporte.quattrus.com/passo-6-graficos/” button_text=”PRÓXIMO” button_alignment=”right” _builder_version=”3.19.17″ custom_button=”on” button_text_size=”14px” button_text_color=”#434343″ button_bg_color=”#f0f0f0″ button_border_width=”1px” button_border_color=”#dddddd” button_use_icon=”off” custom_css_before=”border: #ddd;||” global_colors_info=”{}”] [/et_pb_button][/et_pb_column][et_pb_column type=”1_5″ _builder_version=”3.25″ custom_padding=”|||” global_colors_info=”{}” custom_padding__hover=”|||”][/et_pb_column][/et_pb_row][et_pb_row disabled_on=”||on” _builder_version=”3.25″ background_size=”initial” background_position=”top_left” background_repeat=”repeat” global_colors_info=”{}”][et_pb_column type=”4_4″ _builder_version=”3.25″ custom_padding=”|||” global_colors_info=”{}” custom_padding__hover=”|||”][et_pb_button button_url=”https://suporte.quattrus.com/passo-4-cadastrando-itens-de-controle/” button_text=”ANTERIOR” button_alignment=”center” _builder_version=”3.19.17″ custom_button=”on” button_text_size=”14px” button_text_color=”#434343″ button_bg_color=”#f0f0f0″ button_border_width=”1px” button_border_color=”#dddddd” button_use_icon=”off” global_colors_info=”{}”] [/et_pb_button][et_pb_text _builder_version=”3.27.4″ text_text_color=”#6b6b6b” text_letter_spacing=”4px” text_orientation=”center” global_colors_info=”{}”] [/et_pb_text][et_pb_button button_url=”https://suporte.quattrus.com/passo-6-graficos/” button_text=”PRÓXIMO” button_alignment=”center” _builder_version=”3.19.17″ custom_button=”on” button_text_size=”14px” button_text_color=”#434343″ button_bg_color=”#f0f0f0″ button_border_width=”1px” button_border_color=”#dddddd” button_use_icon=”off” custom_css_before=”border: #ddd;||” global_colors_info=”{}”] [/et_pb_button][/et_pb_column][/et_pb_row][/et_pb_section]