

 Español
 English
Artigos Relacionados
[/et_pb_text][/et_pb_column][et_pb_column type=”3_5″ _builder_version=”3.25″ custom_padding=”|||” global_colors_info=”{}” custom_padding__hover=”|||”][et_pb_post_title meta=”off” featured_image=”off” _builder_version=”3.19.9″ title_font=”|700||||on|||” title_font_size=”36px” global_colors_info=”{}”] [/et_pb_post_title][et_pb_tabs _builder_version=”4.9.10″ global_colors_info=”{}”][et_pb_tab title=”Cadastrar Item” _builder_version=”4.9.10″ global_colors_info=”{}”]
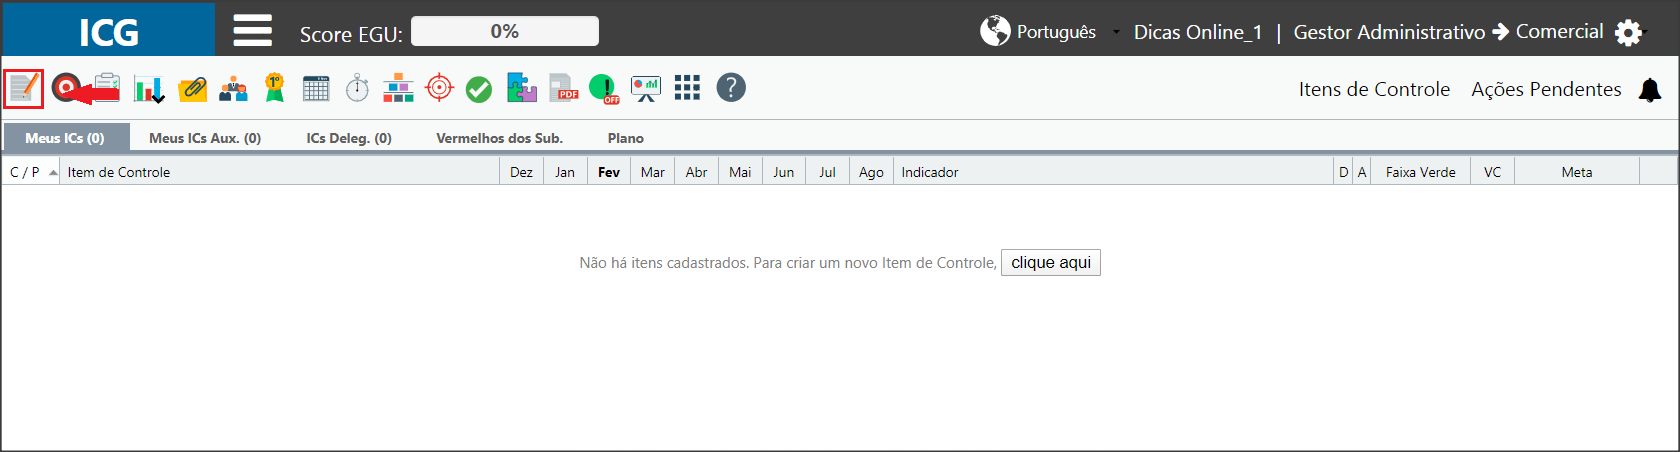
Após realizar o seu login, é o momento de cadastrar seus itens de controle. Clique no ícone Cadastro de Item de Controle.
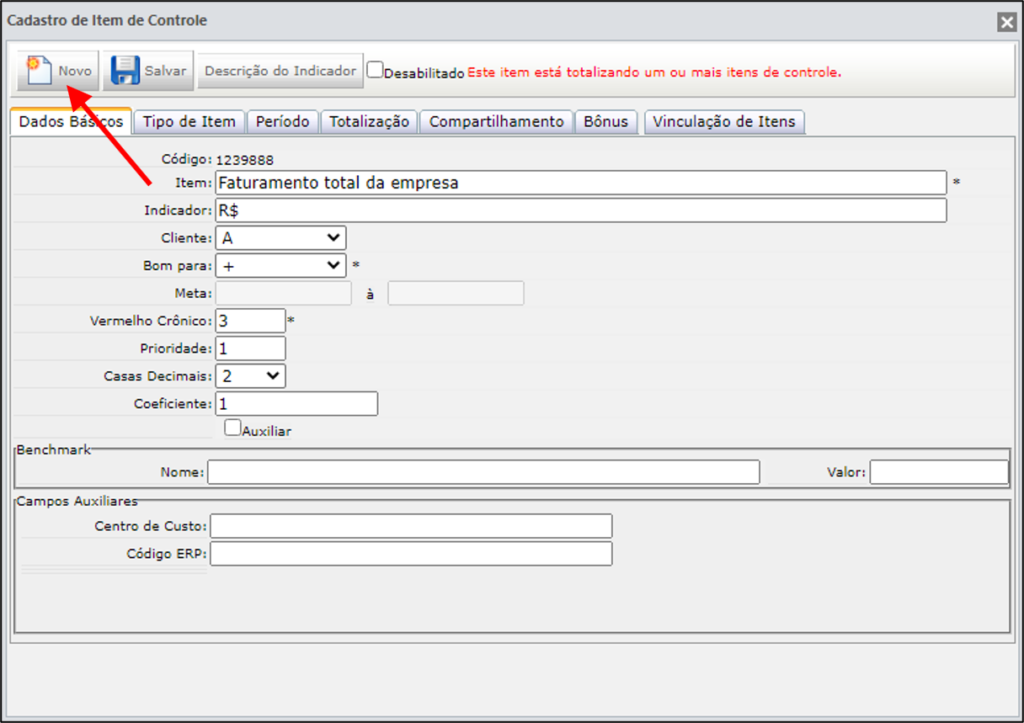
O sistema abrirá a tela de Cadastro de Item de Controle.
Se você já tiver itens cadastrados, clique em Novo para adicionar um item de controle.
Veja nas abas ao lado como preencher os campos do seu Item de Controle.
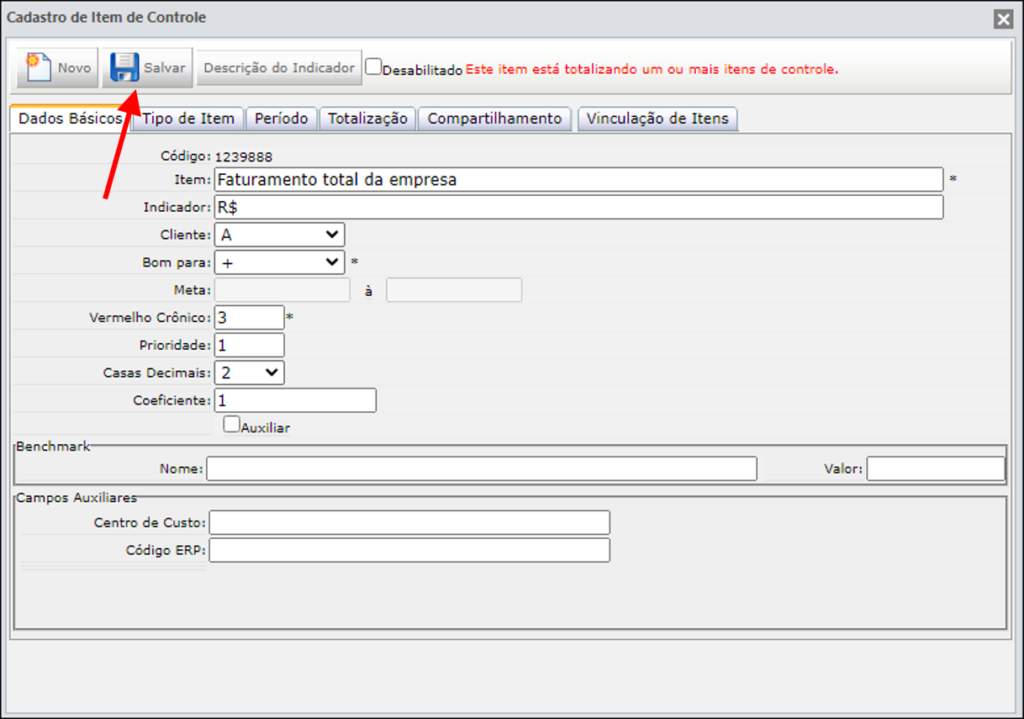
Após finalizar o cadastro do item, clique em Salvar.
Clique no ícone do ICG para atualizar a página inicial.

O item de controle aparecerá no seu Dashboard.

Preencha os campos solicitados.

Para saber o que cada campo significa, acesse o artigo Cadastrando um Novo Item.
Você também poderá optar por tornar o item Auxiliar. No seu Dashboard, ele ficará na aba de Itens Auxiliares. Para saber mais, acesse Itens de Controle Auxiliares.
[/et_pb_tab][et_pb_tab title=”Tipo de Item” _builder_version=”4.9.10″ global_colors_info=”{}”]Após preencher todos os Dados Básicos, é o momento de ir para a próxima aba.
Na aba Tipo de Item, você irá selecionar como será o input de dados e como será calculada a Meta.
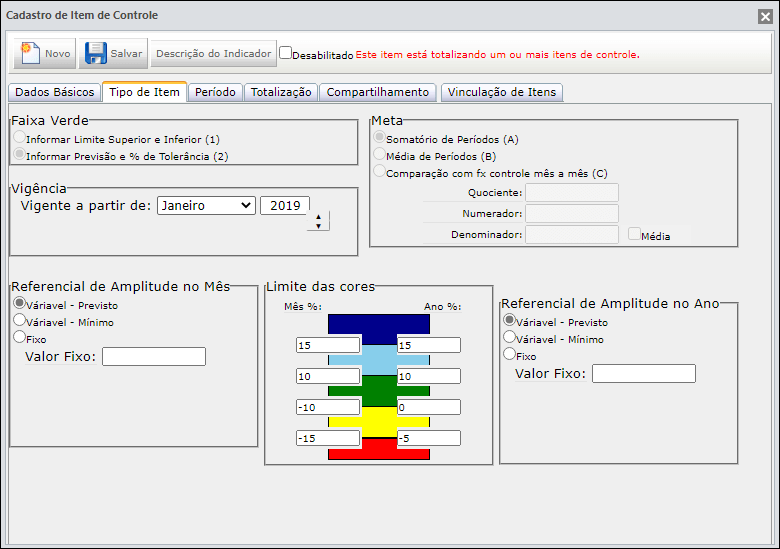
Para saber como preencher esta aba, acesse o artigo Tipos de Item de Controle.
[/et_pb_tab][et_pb_tab title=”Período” _builder_version=”4.9.10″ global_colors_info=”{}”]Por padrão, o ICG cadastra os itens de Janeiro a Dezembro, mas você poderá alterar a duração de um item na aba Período.
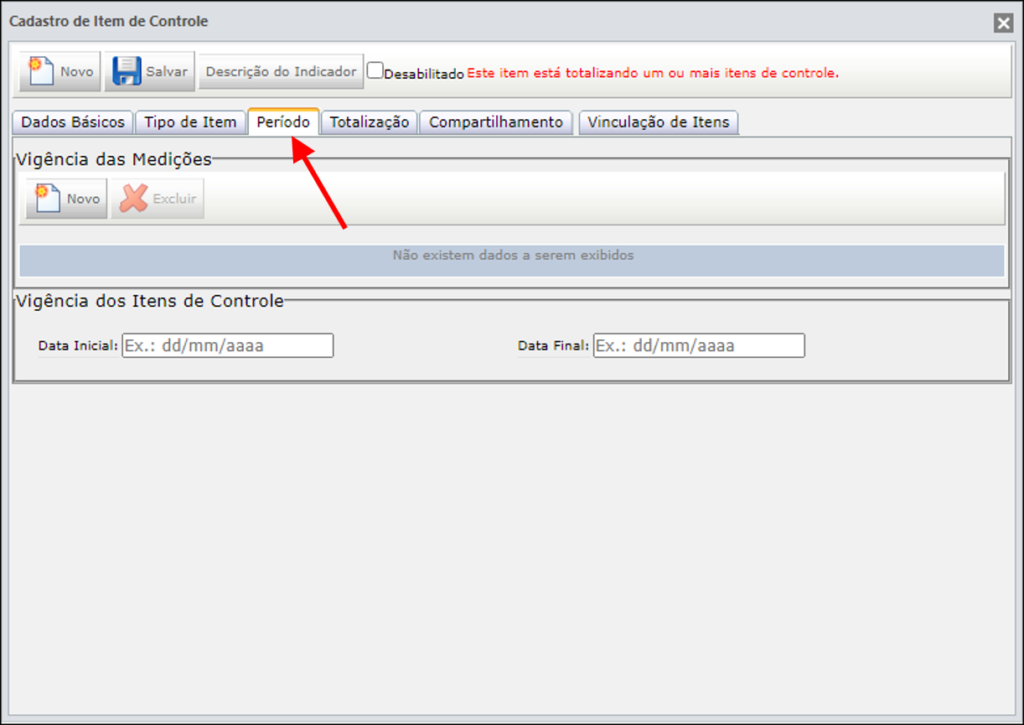
Para mais informações, acesse o artigo Período dos Itens de Controle.
Atenção: Alterando o período, irá alterar o cálculo da Meta para os tipos 2A e 2B.
[/et_pb_tab][et_pb_tab title=”Totalização” _builder_version=”4.9.10″ global_colors_info=”{}”]Muitas vezes, a medição de um item de controle depende de outros itens. Na aba Totalização, você poderá totalizar seu item de controle utilizando as seguintes funções:
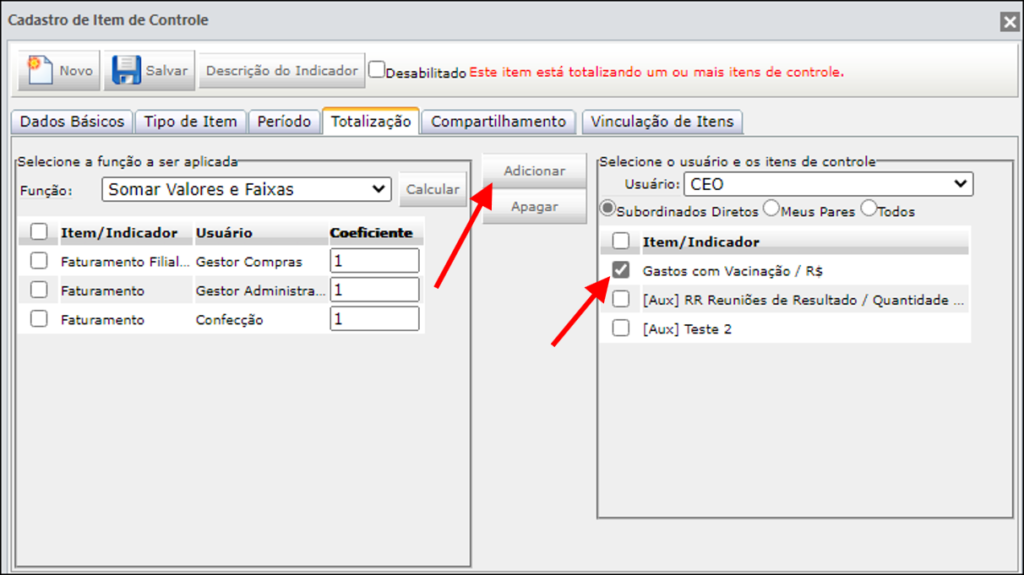
Para saber mais sobre Totalização, clique aqui.
Quando um item for totalizado, ficará indicado no painel de Itens de Controle. Veja mais em Aba de Totalização e Vinculação.
[/et_pb_tab][et_pb_tab title=”Desabilitar e Restaurar Itens” _builder_version=”4.9.10″ global_colors_info=”{}”]Ao desabilitar um Item de Controle, ele não ficará mais visível no seu painel. Para desabilitar um item, basta ir no cadastro do item e clicar em Desabilitado.
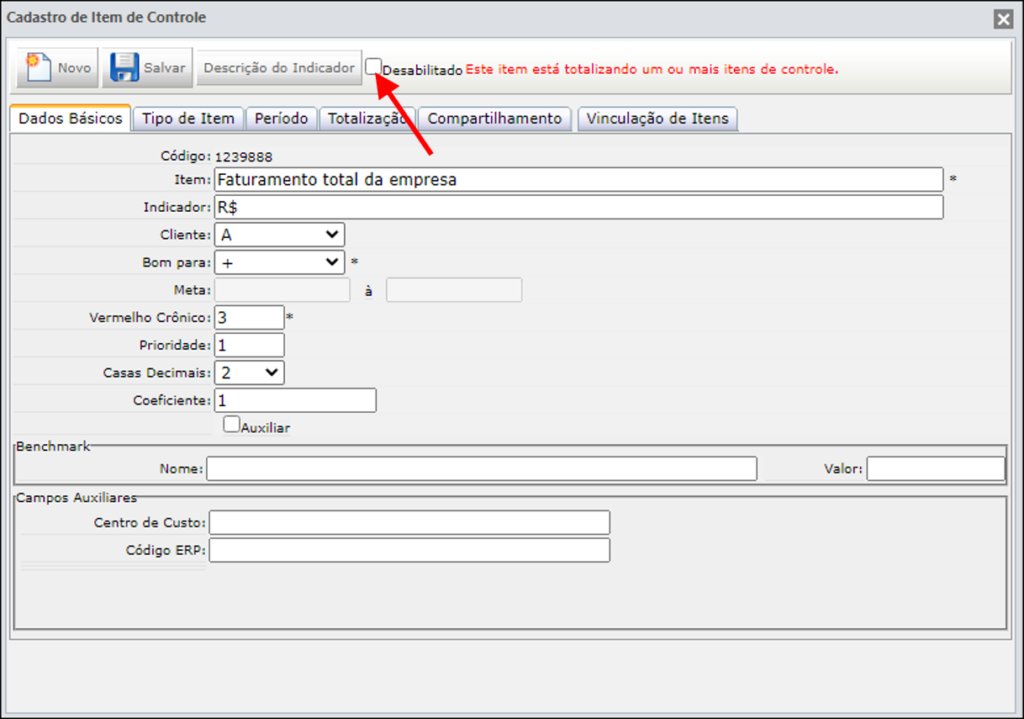
Para saber em quais casos um item não poderá ser desabilitado, acesse o artigo Excluir Item de Controle.
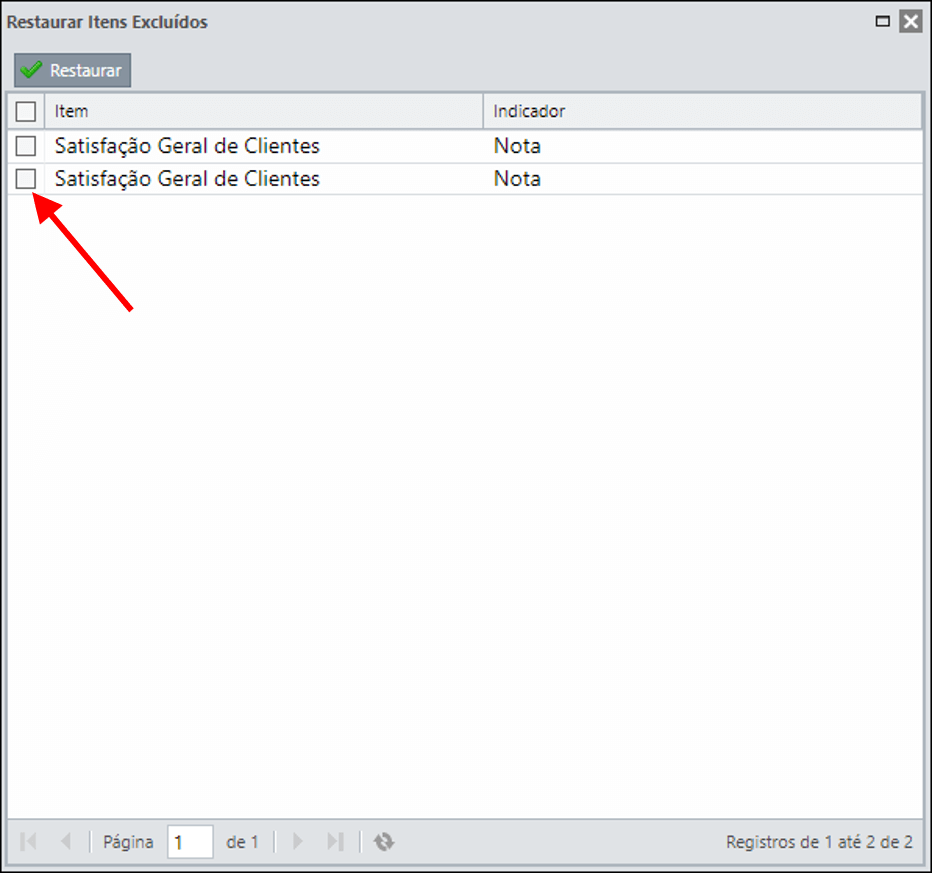
Para restaurar itens de controle desabilitados, clique no ícone indicado abaixo e selecione a opção Restaurar Itens Excluídos.
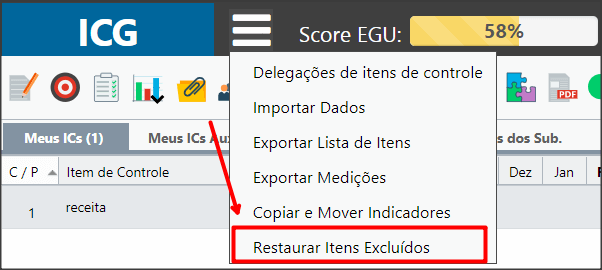
Selecione o item desejado e clique em Restaurar.
[/et_pb_tab][/et_pb_tabs][/et_pb_column][et_pb_column type=”1_5″ _builder_version=”3.25″ custom_padding=”|||” global_colors_info=”{}” custom_padding__hover=”|||”][et_pb_image src=”https://suporte.quattrus.com/wp-content/uploads/2019/02/banner-suporte-01.png” title_text=”banner-suporte-01″ align_tablet=”center” align_phone=”” align_last_edited=”on|desktop” disabled_on=”on|on|” admin_label=”ESP – Banner – Contato Suporte” _builder_version=”4.14.4″ z_index=”0″ always_center_on_mobile=”on” global_module=”10498″ saved_tabs=”all” locked=”off” global_colors_info=”{}”][/et_pb_image][/et_pb_column][/et_pb_row][et_pb_row column_structure=”1_5,1_5,1_5,1_5,1_5″ disabled_on=”on|on|” module_class=” et_pb_row_fullwidth” _builder_version=”3.25″ width=”89%” width_tablet=”80%” width_phone=”” width_last_edited=”on|desktop” max_width=”89%” max_width_tablet=”80%” max_width_phone=”” max_width_last_edited=”on|desktop” make_fullwidth=”on” global_colors_info=”{}”][et_pb_column type=”1_5″ _builder_version=”3.25″ custom_padding=”|||” global_colors_info=”{}” custom_padding__hover=”|||”][/et_pb_column][et_pb_column type=”1_5″ _builder_version=”3.25″ custom_padding=”|||” global_colors_info=”{}” custom_padding__hover=”|||”][et_pb_button button_url=”https://suporte.quattrus.com/passo-3-configurando-o-dashboard/” button_text=”ANTERIOR” button_alignment=”left” _builder_version=”3.19.17″ custom_button=”on” button_text_size=”14px” button_text_color=”#434343″ button_bg_color=”#f0f0f0″ button_border_width=”1px” button_border_color=”#dddddd” button_use_icon=”off” global_colors_info=”{}”] [/et_pb_button][/et_pb_column][et_pb_column type=”1_5″ _builder_version=”3.25″ custom_padding=”|||” global_colors_info=”{}” custom_padding__hover=”|||”][et_pb_text _builder_version=”3.27.4″ text_text_color=”#6b6b6b” text_letter_spacing=”4px” text_orientation=”center” custom_margin=”|-73px||-73px” global_colors_info=”{}”] [/et_pb_text][/et_pb_column][et_pb_column type=”1_5″ _builder_version=”3.25″ custom_padding=”|||” global_colors_info=”{}” custom_padding__hover=”|||”][et_pb_button button_url=”https://suporte.quattrus.com/passo-5-inserindo-medicoes/” button_text=”PRÓXIMO” button_alignment=”right” _builder_version=”3.19.17″ custom_button=”on” button_text_size=”14px” button_text_color=”#434343″ button_bg_color=”#f0f0f0″ button_border_width=”1px” button_border_color=”#dddddd” button_use_icon=”off” custom_css_before=”border: #ddd;||” global_colors_info=”{}”] [/et_pb_button][/et_pb_column][et_pb_column type=”1_5″ _builder_version=”3.25″ custom_padding=”|||” global_colors_info=”{}” custom_padding__hover=”|||”][/et_pb_column][/et_pb_row][et_pb_row disabled_on=”||on” _builder_version=”3.25″ background_size=”initial” background_position=”top_left” background_repeat=”repeat” global_colors_info=”{}”][et_pb_column type=”4_4″ _builder_version=”3.25″ custom_padding=”|||” global_colors_info=”{}” custom_padding__hover=”|||”][et_pb_button button_url=”https://suporte.quattrus.com/passo-3-configurando-o-dashboard/” button_text=”ANTERIOR” button_alignment=”center” _builder_version=”3.19.17″ custom_button=”on” button_text_size=”14px” button_text_color=”#434343″ button_bg_color=”#f0f0f0″ button_border_width=”1px” button_border_color=”#dddddd” button_use_icon=”off” global_colors_info=”{}”] [/et_pb_button][et_pb_text _builder_version=”3.27.4″ text_text_color=”#6b6b6b” text_letter_spacing=”4px” text_orientation=”center” global_colors_info=”{}”] [/et_pb_text][et_pb_button button_url=”https://suporte.quattrus.com/passo-5-inserindo-medicoes/” button_text=”PRÓXIMO” button_alignment=”center” _builder_version=”3.19.17″ custom_button=”on” button_text_size=”14px” button_text_color=”#434343″ button_bg_color=”#f0f0f0″ button_border_width=”1px” button_border_color=”#dddddd” button_use_icon=”off” custom_css_before=”border: #ddd;||” global_colors_info=”{}”] [/et_pb_button][/et_pb_column][/et_pb_row][/et_pb_section]